
TL;DR
Creating beautiful soy milk latte art requires a different approach than dairy. The key is to manage soy’s unique properties by using very cold milk, aerating for a much shorter time, and stopping the steaming process at a lower temperature (around 130°F or 55°C) to prevent curdling. After steaming, swirl the pitcher vigorously to get a glossy, ‘wet paint’ texture, then pour quickly and confidently to achieve clean, stable designs.
The Science of Soy: Why It Behaves Differently
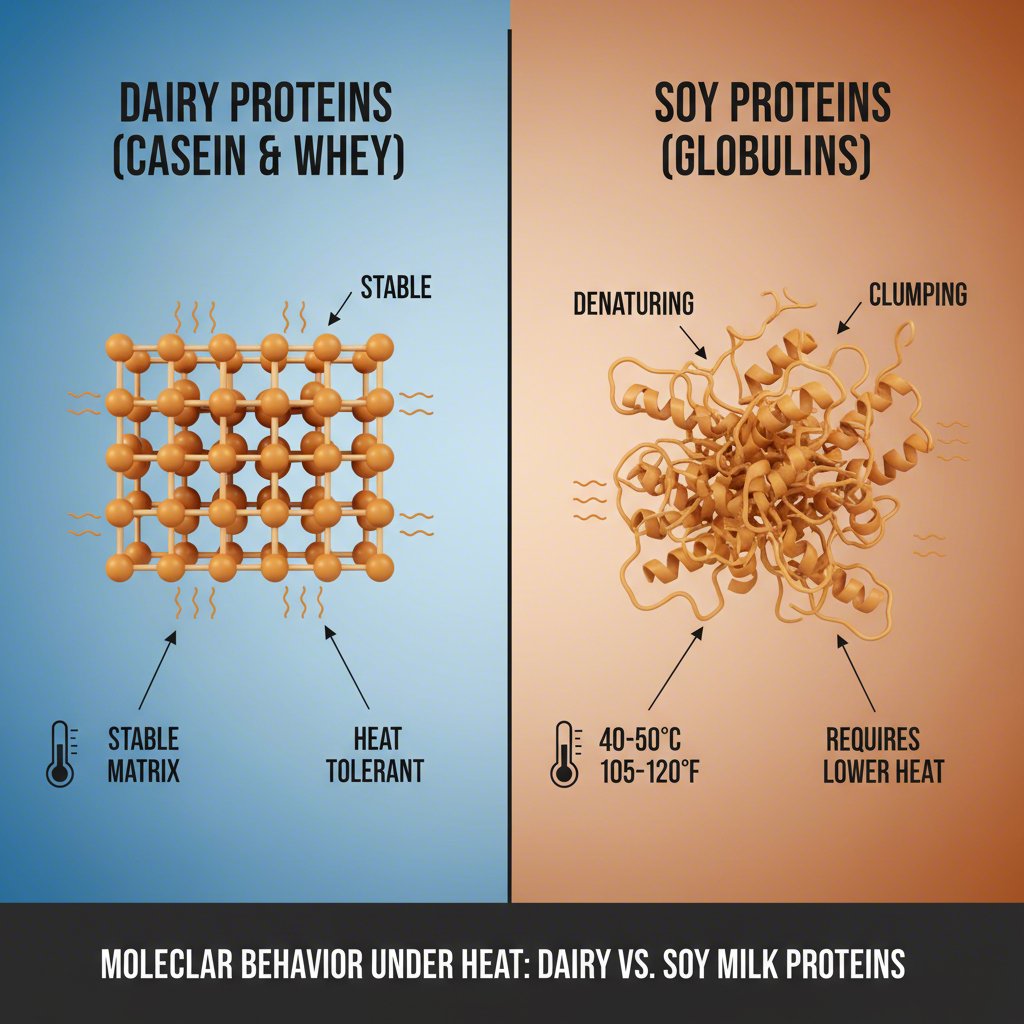
Many baristas find steaming soy milk frustrating, facing issues like curdling, splitting, or foam that’s either too bubbly or too weak. Understanding the science behind soy milk is the first step to mastering it. Unlike dairy milk, which has a forgiving balance of fat, protein, and lactose, soy milk has a different composition that makes it more sensitive. Its proteins are less stable and can denature, or break down, almost immediately when exposed to high heat or acidity.
This heat sensitivity is why soy milk often curdles. As explained in a guide by Home Cafe by Charlie, heating soy milk beyond 130°F (55°C) can cause it to curdle, resulting in an unpleasant texture. Furthermore, the acidity in lighter roast coffees can react poorly with soy’s proteins, causing the milk to separate as soon as it hits the espresso. For better results, it’s recommended to pair soy milk with darker roasts that have lower acidity.
Compared to other milks, soy’s properties stand out:
- Dairy Milk: High in fat and stable proteins (casein and whey), creating a rich, elastic microfoam that’s ideal for art.
- Soy Milk: Lower in fat but high in protein, which can create stable foam but also denatures quickly with heat. It can become too foamy if not handled carefully.
- Oat Milk: Contains more fats and carbs, making it one of the closest alternatives to whole milk in terms of richness and steaming tolerance.
- Almond Milk: Tends to be thinner and can create a stiff, dry foam if over-aerated, making it difficult to pour detailed art.
The quality of the soy milk itself also plays a significant role. Barista-blend soy milks often contain stabilizers that help them withstand heat and create a creamier, more consistent foam. For those who prefer making plant-based milks at home, ensuring a smooth, well-emulsified blend is crucial. If you’re looking to craft fresh, additive-free plant-based milks right in your kitchen, Soy Milk Quick offers an expert, comprehensive guide to the best plant milk makers for every need and budget, featuring detailed comparisons to help you find the perfect machine.
A Step-by-Step Guide to Steaming Soy Milk
Achieving silky, pourable microfoam with soy milk is all about precision and control. It requires adjusting the standard dairy steaming technique to accommodate soy’s unique properties. Follow these steps to transform your soy milk from a bubbly mess into a glossy canvas for latte art.
- Start with Cold Milk: Always use soy milk straight from the refrigerator. As noted by Home Cafe by Charlie, cold milk accepts air better and gives you more time to texturize it before it gets too hot.
- Purge the Steam Wand: Before you begin, purge your steam wand to clear out any residual water. This ensures you are only injecting dry steam into the milk, a crucial tip for maintaining hygiene and performance.
- Aerate for a Shorter Time: This is the most critical step. Soy milk needs significantly less air than dairy. Introduce air for only a second or two at the very beginning—just long enough to hear a gentle ‘tss’ sound. Over-aerating will create stiff, bubbly foam that is impossible to pour.
- Submerge and Create a Vortex: Immediately after that short burst of air, submerge the steam wand deeper into the milk and position it to create a strong vortex, or whirlpool. This motion is essential for breaking down any large bubbles and incorporating the air evenly, resulting in a silky, homogenous texture.
- Watch the Temperature: Do not overheat the milk. Stop steaming when the pitcher is warm to the touch, well before it becomes too hot to handle. The ideal temperature is around 130°F (55°C). Going hotter risks curdling the milk and ruining the texture.
- Groom the Milk: Once steaming is complete, immediately tap the pitcher on the counter to pop any surface bubbles. Then, swirl the milk vigorously. The goal is a texture that looks like shiny, wet paint. This step is vital for integrating the foam and milk, making it pourable for latte art.
Mastering the Pour: Techniques for Soy Milk
Pouring latte art with soy milk is a different game; it demands speed and a specific technique to prevent the dreaded split. Because soy foam is less stable than dairy foam, it can separate quickly if you hesitate. The experts at Single O recommend a bold, confident approach to get the best results.
First, you must prepare the espresso canvas. Before starting your main pour, add a small splash of the steamed soy milk into the espresso and stir or swirl it vigorously. This ‘breaks the crema’ and integrates it with the milk, creating a more uniform base that is less likely to cause splitting. This initial agitation is a non-negotiable step for clean soy latte art.
When you’re ready for the main pour, commit to a fast and steady stream. Begin pouring from a height to allow the milk to dive beneath the crema. As the cup becomes about three-quarters full, lower the pitcher closer to the surface to allow the white microfoam to appear and begin your design. Speed is your ally here; a fast, consistent pour keeps the milk and foam integrated, preventing the separation that can ruin a pattern.
To help you perfect your technique, here is a table for troubleshooting common soy pouring issues:
| Problem | Likely Cause | Solution |
|---|---|---|
| Milk Splitting or Curdling | Overheated milk or highly acidic coffee. | Steam to a lower temperature (130°F/55°C) and use a darker roast espresso. |
| Art Looks Bubbly and Etched | Too much air was incorporated during steaming. | Aerate for a much shorter time (1-2 seconds) and focus on creating a strong vortex. |
| Design is Weak or Fades Quickly | Foam is not stable enough; pouring too slowly. | Swirl milk vigorously before pouring. Pour faster and more confidently. |
| No Contrast in the Art | Crema was not broken; milk was not integrated. | Always agitate the espresso with a splash of soy milk before the main pour. |
Frequently Asked Questions
1. Does soy milk make good lattes?
Yes, soy milk can make excellent lattes, offering a thick body and a distinct nutty flavor that pairs especially well with darker espresso roasts. However, its success depends entirely on using the correct steaming and pouring techniques to manage its heat sensitivity and unique protein structure. When handled properly, it produces a creamy and satisfying latte.
2. How can I make soy milk froth better?
To make soy milk froth better, start with very cold milk directly from the fridge. When steaming, introduce air for only a very brief period at the beginning to avoid creating large, stiff bubbles. The key is to quickly submerge the wand to create a smooth, rolling vortex. This incorporates the air into silky microfoam rather than letting it sit on top as a separate, bubbly layer. Finally, avoid overheating, as this will destroy the foam’s texture.
бесплатные серии сериала сверхъестественное онлайн
современные дизайнерские светильники потолочные светильники в стиле лофт
Great work on keeping things readable, the post never drags or repeats itself which I really appreciate, and a stop at sunwindemporium added a bit more context that fit naturally with what was already said here, no need to read everything twice to get the point being made today.
Liked the way the post balanced confidence and humility, and a stop at midnighttrendhouse maintained the same balance, knowing when to assert and when to acknowledge uncertainty is a sign of mature thinking and the writers here have clearly developed that calibration through what I assume is years of careful work on their craft.
Honest opinion is that this is the kind of post that builds long term trust with readers, and a look at sunsetcrestboutique reinforced that perception, the slow accumulation of trust through consistent quality is the only sustainable way to build a real audience and this site is clearly playing that long game.
Bookmark added with a small note about why, and a look at honeymarket prompted another bookmark with another note, the bookmarks I annotate are the ones I expect to return to deliberately rather than stumble into and this site is generating annotated bookmarks at a higher rate than my usual content sources by some margin.
Honestly the simplicity of the explanation made the topic click for me in a way other writeups had not, and a look at depotglow continued that clarity into related areas, when a writer gets the level of explanation right the reader does the heavy lifting themselves and the post just enables it.
Reading this in a quiet coffee shop matched the calm energy of the writing, and a stop at nutmegnetwork extended that environmental match, content that has its own ambient quality which can match or clash with surroundings is content with a personality and this site has the kind of personality that suits calm reading.
Closed it feeling slightly more competent in the topic than I started, and a stop at ivypier reinforced that competence boost, real learning is rare in casual online reading but it does happen sometimes and this site managed to make it happen for me today which is genuinely worth pausing to acknowledge.
Now feeling the small relief of finding writing that does not condescend, and a stop at ideasneedfocus extended that respect for readers, content that treats its audience as capable adults rather than as people to be managed produces a different reading experience and this site has clearly chosen the respectful approach across all pieces.
If I am being honest this is the kind of site I quietly hope my own work will someday resemble, and a stop at elitefests extended that aspirational feeling, finding work that models what I want to produce is part of why I read carefully and this site has been performing that modelling function for me lately consistently.
Let me save you some headache I learned the hard way. I swear half the “luxury” fleets down here are straight-up marketing scams. You book a premium ride online, arrive all excited, then boom — hidden service fees everywhere. Fool me thrice, shame on both of us I guess, lesson learned. If you seriously need a legit vehicle to cruise around the city, do some real digging first and read actual customer reviews. Miami without wheels is basically a hostage situation, whether you are doing Brickell mornings, South Beach nights, or a spontaneous Keys trip.
Most of these local agencies are just shiny websites hiding the same overpriced junk, until I finally found one outfit that actually delivers what’s in the photos. If you are looking for the only straight shooter for premium rentals across South Florida, check the details here: luxury auto rental [url=https://luxury-car-rental-miami-3.com]luxury auto rental[/url]. Yeah, valet in Miami Beach will cost you an arm, but that’s not their fault. Just drive safe out there and maybe skip the extra windshield protection thing. hope this helps some of you save a few bucks.
мостбет зеркало для android [url=http://mostbet83506.help]мостбет зеркало для android[/url]
Honestly slowed down to read this carefully which is not my default, and a look at urgesnare kept me in that careful reading mode, the kind of writing that demands attention by being worth attention is rare in a media environment full of content engineered to be skimmed not read with any real focus today.
The depth of coverage felt about right for the format, neither shallow nor overwhelming, and a look at focusactivation kept that calibration going, getting the depth right for blog format is genuinely difficult because too shallow loses experts and too deep loses beginners but this site nailed it nicely which I really do appreciate.