
TL;DR
Making soy milk at home is a simple and rewarding process that involves soaking, blending, straining, and cooking dried soybeans with water. All you really need are soybeans, water, a blender, and a straining cloth like a nut milk bag. The result is fresh, creamy, preservative-free milk that is significantly cheaper and often tastes better than many store-bought alternatives.
Why Bother Making Soy Milk at Home?
In a world of convenient, ready-made options, you might wonder if it’s worth the effort to make your own soy milk. For many, the answer is a resounding yes. The primary benefits—cost, freshness, and control over ingredients—make the small time investment incredibly worthwhile. Homemade soy milk has a clean, fresh flavor that is noticeably different from packaged versions, which often contain preservatives, thickeners, and added sugars to extend their shelf life.
The cost savings are also significant. As noted in user discussions, a quart of homemade organic soy milk can cost as little as $1.25 to produce, whereas commercial organic soy milk can easily cost three times that amount. By buying dried soybeans in bulk, you can reduce the cost even further, making it one of the most economical plant-based milks available.
Furthermore, making soy milk at home gives you complete control over what goes into your final product. You can choose to use organic, non-GMO soybeans, add natural sweeteners like maple syrup or dates, and infuse it with flavors like vanilla or cinnamon, all without the gums and additives found in many commercial products. This control is not just about taste; it’s about creating a healthier, more natural beverage tailored exactly to your preferences.
| Feature | Homemade Soy Milk | Store-Bought Soy Milk |
|---|---|---|
| Cost | Very low (around $1.25/quart for organic) | Higher (often $3-5/quart for organic) |
| Ingredients | Soybeans and water | Soybeans, water, sweeteners, oils, gums, preservatives |
| Taste | Fresh, clean, and beany | Varies; often sweetened and less fresh |
| Customization | Fully customizable (sweetness, flavor) | Limited to available commercial varieties |
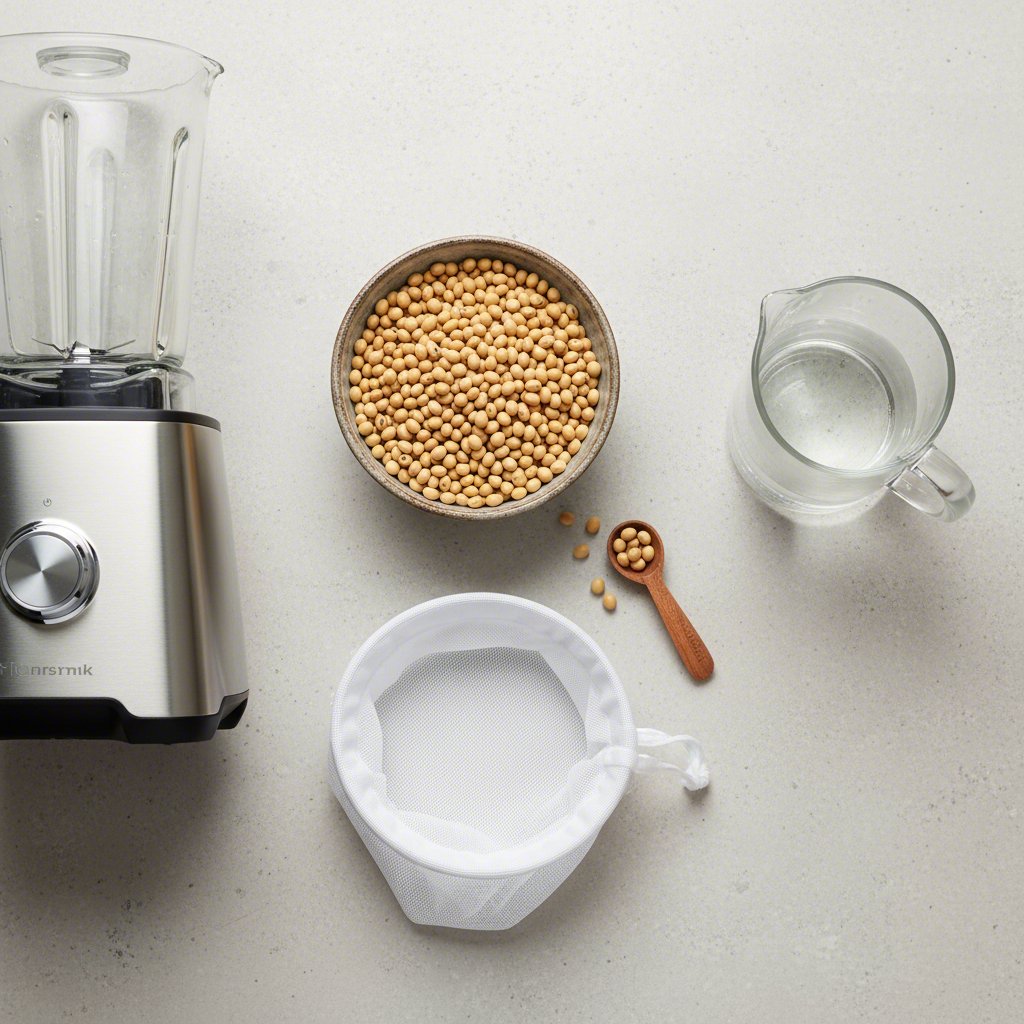
Essential Ingredients and Equipment
One of the best parts about making soy milk is the simplicity of its components. You don’t need a long list of specialty items; the basics are likely already in your kitchen. The process is straightforward and relies on just two core ingredients and a few key pieces of equipment.
Ingredients
- Dried Yellow Soybeans: This is the star of the show. Look for high-quality, non-GMO or organic soybeans for the best flavor and nutritional value. A common ratio used in many recipes is about 1 cup of dried beans to make approximately 1 to 2 quarts of milk.
- Water: Use filtered water for the best taste, as tap water can sometimes impart a chlorine flavor. You will need water for both soaking and blending.
Equipment
- High-Speed Blender: A powerful blender is crucial for breaking down the soaked soybeans into a smooth, creamy slurry.
- Nut Milk Bag or Cheesecloth: This is essential for straining the blended mixture to separate the milk from the pulp (known as okara). A nut milk bag is often easiest to handle.
- Large Bowl and Pot: You’ll need a large bowl to soak the beans and to strain the milk into, and a large pot to cook the final product.
While a standard high-speed blender works perfectly, those who plan to make plant-based milks regularly might explore specialized machines. For those looking to craft fresh, additive-free plant-based milks right in your kitchen, Soy Milk Quick offers an expert, comprehensive guide to the best plant milk makers for every need and budget, featuring detailed comparisons, pros, and cons.
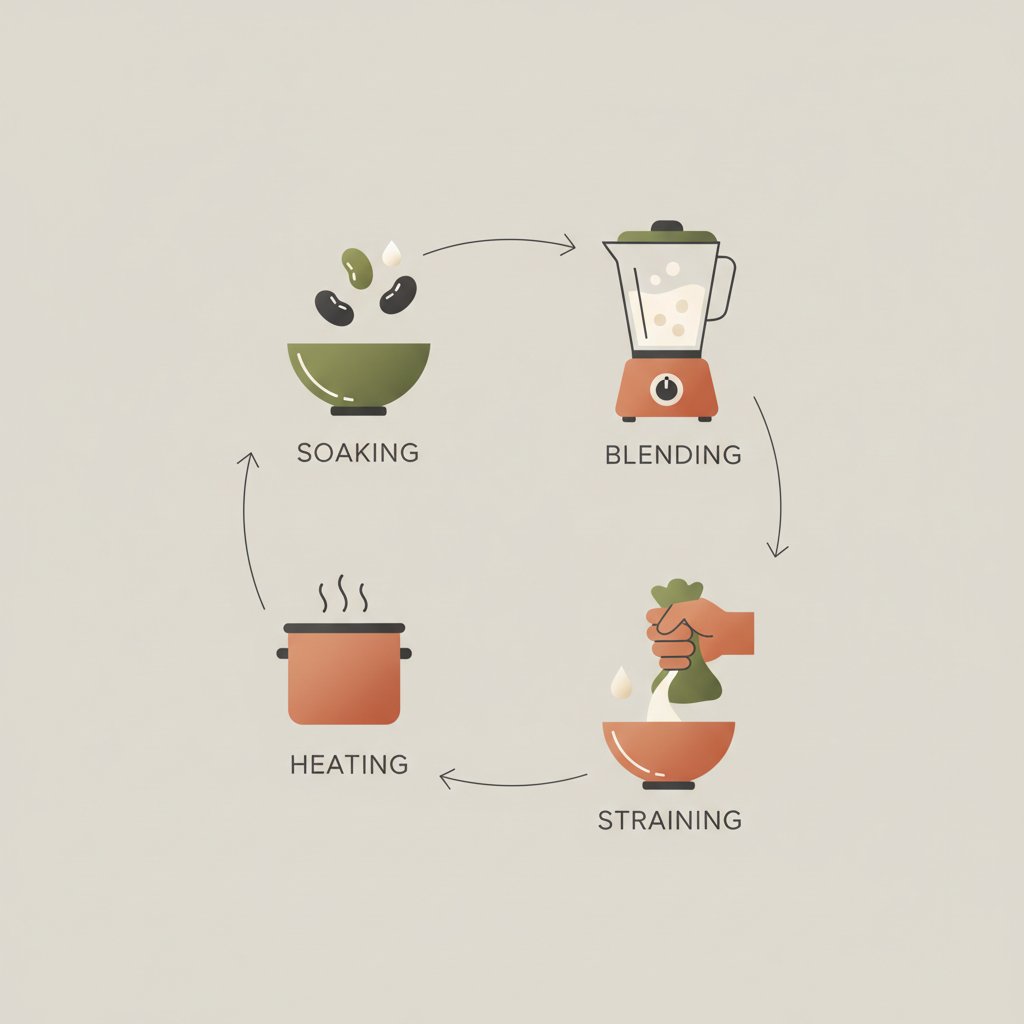
The Step-by-Step Process for Perfect Homemade Soy Milk
Creating your own soy milk is a simple four-stage process: soaking, blending, straining, and cooking. Each step is important for achieving a smooth texture and a pleasant, non-grassy flavor. Following these instructions will give you a delicious and fresh batch of soy milk every time.
- Soak the Soybeans: Place your dried soybeans in a large bowl and cover them with several inches of water. Let them soak for at least 8 hours or overnight. The beans will expand to two or three times their original size. According to some guides, like one from Alphafoodie, you can optionally peel the skins off the beans after soaking for an even creamier result, though this step is not required.
- Blend the Beans and Water: Drain the soaking water and rinse the beans thoroughly. Transfer the soaked beans to your high-speed blender. Add fresh, filtered water. A common starting ratio is 4 cups of water per 1 cup of soaked beans, but you can adjust this for a thicker or thinner consistency. Blend on high for at least one minute, or until the mixture is completely smooth and frothy. You may need to do this in batches, as suggested by Forks Over Knives.
- Strain the Mixture: Position a nut milk bag or several layers of cheesecloth over a large bowl or pot. Pour the blended soybean slurry into the bag. Twist the top of the bag closed and squeeze firmly to press all the liquid out. The liquid is your raw soy milk, and the pulp left inside the bag is called okara, which can be saved for use in baking or other recipes.
- Cook the Soy Milk: This is a critical step. Raw soy milk contains enzymes that can be difficult to digest and give it a raw, beany flavor. Pour the strained milk into a large pot and bring it to a gentle boil over medium heat, stirring frequently to prevent it from sticking or boiling over. Once it reaches a boil, reduce the heat and let it simmer for about 15-20 minutes. Skim off any foam that forms on the surface.
- Cool and Store: After simmering, remove the pot from the heat and let the soy milk cool completely. Once cool, pour it into an airtight container, like a glass jar or bottle, and store it in the refrigerator. Homemade soy milk will typically last for 3 to 5 days.
Customizing Your Soy Milk: Flavoring and Sweetening
One of the greatest advantages of homemade soy milk is that it serves as a blank canvas for flavor. Plain, unsweetened soy milk has a distinct beany taste that some enjoy, but it can be easily customized to suit your preferences. The key is to add any sweeteners or flavorings *after* the cooking process, while the milk is still warm, allowing them to dissolve and infuse properly.
Start with small amounts and adjust to your liking. For a classic sweetened vanilla flavor, try stirring in a tablespoon of maple syrup and half a teaspoon of vanilla extract per quart of milk. You can also blend in pitted dates for a natural, whole-food sweetener. A small pinch of salt is also highly recommended, as it enhances the other flavors and balances the overall taste profile.
Here are some popular additions to get you started:
- Sweeteners: Maple syrup, agave nectar, pitted Medjool dates, or a small amount of sugar.
- Flavor Extracts: Vanilla extract is a classic choice, but almond extract can also add a nice touch.
- Spices: A sprinkle of cinnamon or a dash of nutmeg can create a warm, comforting flavor.
- For Chocolate Milk: Whisk in a tablespoon or two of unsweetened cocoa powder and your preferred sweetener.
Experimenting is part of the fun. By customizing the flavor, you can create a final product that you truly love, making the small effort of making it from scratch even more rewarding. For more ideas on flavorings, recipe guides like the one on Serious Eats offer great starting points.
Frequently Asked Questions
1. Is it worth making your own soy milk?
Yes, for most people it is absolutely worth it. Homemade soy milk offers superior freshness and a cleaner taste without the additives, thickeners, or preservatives found in many commercial brands. You also have complete control over the ingredients, including the type of soybeans and sweeteners used. The significant cost savings, especially when buying dried beans in bulk, make it a highly economical choice as well.
2. Is it cheaper to make your own soymilk?
Definitely. It is significantly cheaper to make your own soy milk. Based on the price of organic soybeans, a quart of homemade soy milk can cost as little as $1.25. In contrast, store-bought organic soy milk often retails for $3 to $5 per quart. The savings are even greater if you use non-GMO, non-organic soybeans, which can bring the cost down to well under a dollar per quart.
aviator एक्सेस लिंक https://aviator50639.help