TL;DR
If your homemade soy milk tastes bitter, the culprit is a naturally occurring enzyme in soybeans called lipoxygenase. This enzyme is activated when the beans are broken down in cold or room-temperature water, creating a grassy or “beany” flavor. The simple and effective solution is to apply heat before or during the blending process. Blending soaked soybeans with boiling water, rather than cold water, deactivates the enzyme and prevents the bitter taste from developing, leaving you with smooth, delicious soy milk.
The Science Behind the Beany Taste: Meet the Lipoxygenase Enzyme
That frustratingly bitter or grassy flavor in your fresh batch of homemade soy milk isn’t a sign of failure—it’s a sign of a completely natural chemical reaction. The primary cause is an enzyme called lipoxygenase, which is present in raw soybeans. When you soak soybeans and then blend them with cool water, you create the perfect environment for this enzyme to go to work. The process of breaking down the bean’s structure exposes the lipoxygenase to oxygen and water, triggering a reaction that produces the compounds responsible for that undesirable “beany” taste.
This is the main reason why store-bought soy milk tastes so different. Commercial producers have perfected methods to neutralize this enzyme before it ever becomes a problem. They often use high-heat processing techniques that instantly deactivate the lipoxygenase the moment the beans are ground. This industrial approach ensures a consistently mild and neutral flavor that is difficult to replicate at home without understanding the science behind it.
By learning to control this enzyme, you can transform your homemade soy milk from a bitter experiment into a smooth, enjoyable staple. The key isn’t a complicated recipe or a special ingredient; it’s simply about the strategic application of heat. Understanding that heat is your tool to stop the bitterness-causing reaction is the foundational “aha!” moment that empowers you to make consistently great-tasting soy milk right in your own kitchen.
The Foolproof Fix: How to Deactivate Bitterness with Heat
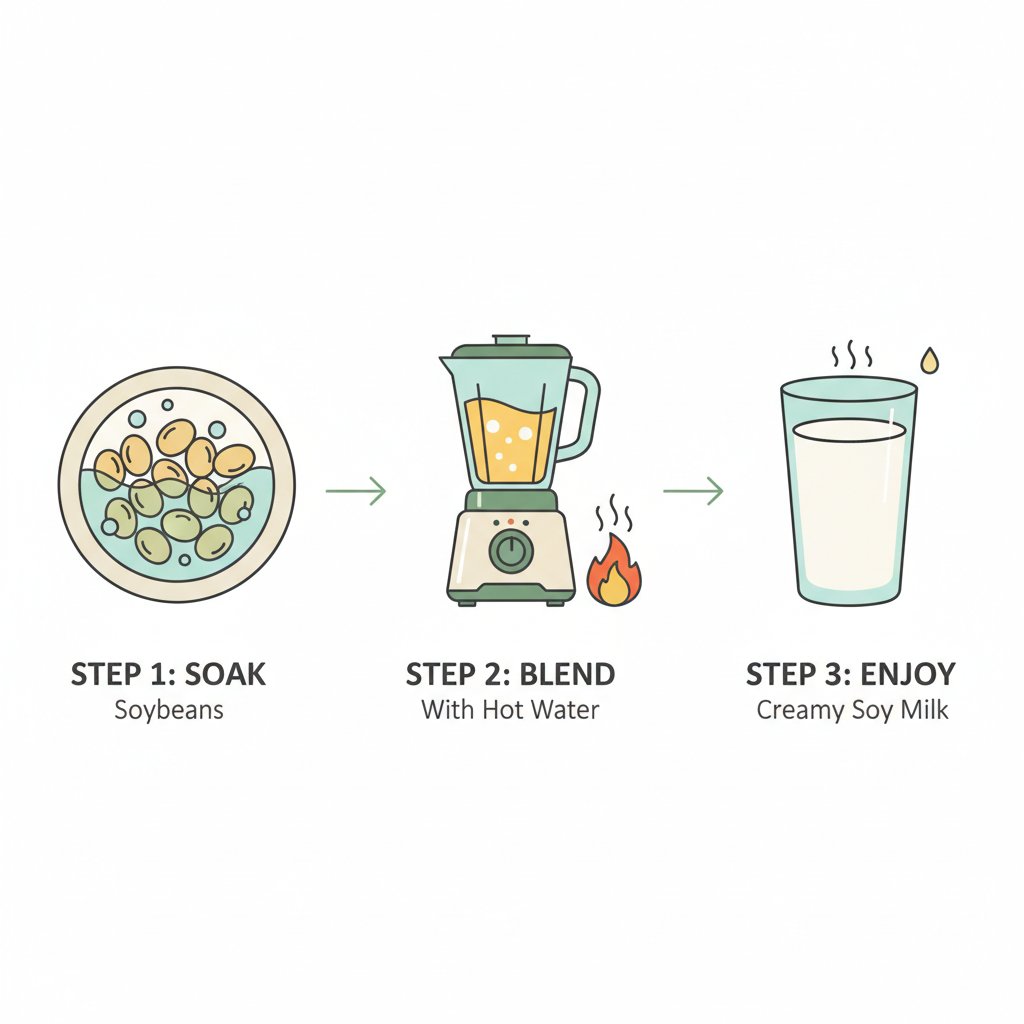
Now that you know the enemy is the lipoxygenase enzyme, the solution becomes clear: you need to neutralize it with heat before it has a chance to ruin your milk’s flavor. The most effective and straightforward way to do this at home is known as the “hot grind” method. This involves blending the soaked beans with boiling water instead of cold water, which deactivates the enzyme on contact. A similar approach, sometimes called a “hot soak,” involves using boiling water during the soaking phase.
This simple change in process makes all the difference. As one home cook discovered in The New Laurel’s Kitchen, a process developed at Cornell University found that grinding the beans in water heated to at least 180°F (82°C) yields a “bland and pleasant tasting” soymilk by inactivating the lipoxidase. This insight is the secret to moving beyond the beany taste and achieving a clean, neutral base for your milk.
Here is a simple, step-by-step guide to making non-bitter soy milk using the hot grind method:
- Soak the Soybeans: Start by soaking your dried soybeans in plenty of cool water for 8-12 hours, or overnight. Make sure they are fully submerged and have room to expand.
- Drain and Rinse: Once soaked, discard the soaking water and give the beans a thorough rinse with fresh water.
- Prepare Boiling Water: While you rinse the beans, bring a separate pot of water to a rolling boil. You will use this hot water for blending.
- Blend in Batches: Add your soaked soybeans to the blender along with the boiling water. A common ratio is one part beans to three or four parts water, but you can adjust for creaminess. Blend on high for at least two minutes until the mixture is completely smooth. Be cautious, as blending hot liquids can create pressure.
- Strain the Milk: Pour the blended mixture through a nut milk bag, several layers of cheesecloth, or a very fine-mesh sieve into a large bowl or pot. Squeeze firmly to extract all the liquid. The leftover pulp is called okara and can be used in other recipes.
- Cook the Milk: Transfer the strained soy milk to a large pot and bring it to a gentle boil over medium heat. Reduce the heat and let it simmer for at least 15-20 minutes, stirring frequently to prevent sticking. This cooking step is crucial for both flavor and safety.
Beyond the Enzyme: Two More Keys to Great Soy Milk
While mastering the use of heat is the most significant step toward eliminating bitterness, two other factors can further refine the taste and texture of your homemade soy milk: dehulling the beans and cooking the milk thoroughly.
First, consider removing the skins from the soybeans after they have been soaked. Some home cooks report that the skins can contribute a slight bitterness or astringency to the final product. While it is an extra step, dehulling is relatively simple. After soaking, you can rub the beans between your hands in a large bowl of water. The skins will loosen and float to the top, where they can be easily skimmed off. It may not be necessary for everyone, but if you are particularly sensitive to off-flavors, it’s a technique worth trying.
Second, and most importantly, you must cook the strained soy milk properly. Raw or undercooked soy milk contains a compound known as a trypsin inhibitor, which can prevent the proper digestion of protein. Thoroughly cooking the milk neutralizes this inhibitor, making it safe to consume and improving its flavor by removing any lingering raw, grassy notes. A rolling simmer for at least 15 to 20 minutes is a good rule of thumb. Be sure to stir constantly, especially at the beginning, as soy milk can easily scorch on the bottom of the pot.
From Bitter to Better: Crafting Deliciously Flavored Soy Milk
Once you’ve mastered the technique for creating a smooth, non-bitter base, your homemade soy milk becomes a blank canvas for delicious creations. The neutral, slightly nutty flavor is perfect for customizing to your exact preferences. Moving beyond simply solving the bitterness problem to actively enhancing the flavor is the final step in making soy milk you’ll truly love.
The simplest way to start is with sweeteners and flavor enhancers. A small amount of sugar, maple syrup, or agave nectar can elevate the taste. A tiny pinch of salt is also a fantastic addition, as it works to balance and round out the flavors without making the milk salty. For a classic taste, a splash of vanilla extract can be added after the cooking process is complete. Many recipes also suggest adding these flavorings during the final 10 minutes of simmering to allow them to meld fully.
Here are a few ideas to get you started:
- Classic Vanilla: Add 1-2 teaspoons of vanilla extract and sweetener to taste for every liter of milk.
- Rich Chocolate: Whisk in 2-3 tablespoons of unsweetened cocoa powder and your preferred sweetener until fully dissolved.
- Spiced Milk: Add a cinnamon stick or a few cardamom pods to the milk while it simmers for a warm, aromatic flavor.
For those who frequently make plant-based milks, achieving consistent results can be made even easier with specialized equipment. If you’re looking to streamline the process, a dedicated guide can help you choose the right appliance. For instance, Soy Milk Quick offers an expert, comprehensive guide to the best plant milk makers, comparing models based on features like processing speed and capacity to help you find the perfect machine for delicious homemade almond, oat, or soy milk.

Frequently Asked Questions About Homemade Soy Milk
1. Why does my homemade soy milk taste bitter?
The bitter taste in homemade soy milk is caused by the enzyme lipoxygenase, which is naturally found in soybeans. When the beans are blended with cold water, this enzyme is activated and produces compounds that have a grassy or “beany” flavor. Commercial soy milk avoids this by using high-heat methods to deactivate the enzyme instantly.
2. How do you remove the bitterness from soy milk?
The most effective way to remove bitterness is to use heat to neutralize the lipoxygenase enzyme before it can act. This is best done by blending the soaked soybeans with boiling water instead of cold water. This “hot grind” method deactivates the enzyme on contact, preventing the development of bitter flavors.
3. How do you get rid of the beany flavor when making homemade soy milk?
Getting rid of the beany flavor involves a three-pronged approach. First, use the hot grind method (blending with boiling water) to stop the main cause of bitterness. Second, consider dehulling the soybeans (removing the skins) after soaking, as the skins can contribute to off-flavors. Finally, ensure you cook the strained soy milk for at least 15-20 minutes to eliminate any raw taste and ensure it’s digestible.
4. How can I make my soy milk taste better?
Once you have a neutral, non-bitter base, you can easily enhance the flavor. Add sweeteners like sugar or maple syrup, a small pinch of salt to balance the taste, and flavorings such as vanilla extract, cocoa powder, or spices like cinnamon. Always add these toward the end of or after the cooking process for the best results.
стоматология москва качественная стоматология
дизайнерские светильники дизайнерские подвесные светильники
организация свадеб организация дня свадьбы
Народ, всем здравствуйте. Долго думал, где найти презент, который запомнят. Перерыл кучу вариантов, но нормального магазина эксклюзивных товаров — раз два и обчёлся. А тут наткнулся сам в обсуждении. В общем, рекомендую посмотреть: премиальные магазины спб премиальные магазины спб Кстати, если ищете элитные подарки для мужчин — там есть даже редкие позиции. Я себе присмотрел часы — качество бомба. И цены соответствуют качеству. Лучший вариант для эксклюзива. Удачи с выбором!