
TL;DR
Making delicious, fresh soy milk at home is surprisingly simple. This easy homemade soy milk recipe requires just two ingredients: dried soybeans and water. The process involves soaking the beans, blending them into a puree, straining the liquid to remove the pulp, and gently cooking the milk to ensure a smooth taste and safe consumption. The result is a creamy, additive-free beverage perfect for any use.
Essential Ingredients and Equipment
Before you begin, gathering your supplies will make the process smooth and enjoyable. At its core, this recipe is beautifully minimalist, relying on the quality of just two main components. You’ll find that the simplicity allows the natural, nutty flavor of the soybeans to shine through, creating a product far superior to many store-bought alternatives that contain preservatives and thickeners.
For the best-tasting soy milk, start with high-quality soybeans. Look for organic, non-GMO dried soybeans, which should be pale yellow, round, and smooth. The beans are the star of the show, so a fresh, good-quality batch will make a noticeable difference in the final product. The only other required ingredient is filtered water, which will be used for both soaking and blending. A common and effective ratio, suggested by many home cooks including those at Mary’s Test Kitchen, is about 1 to 1.25 cups of dried beans to 4-5 cups of water, which yields a perfectly creamy milk.
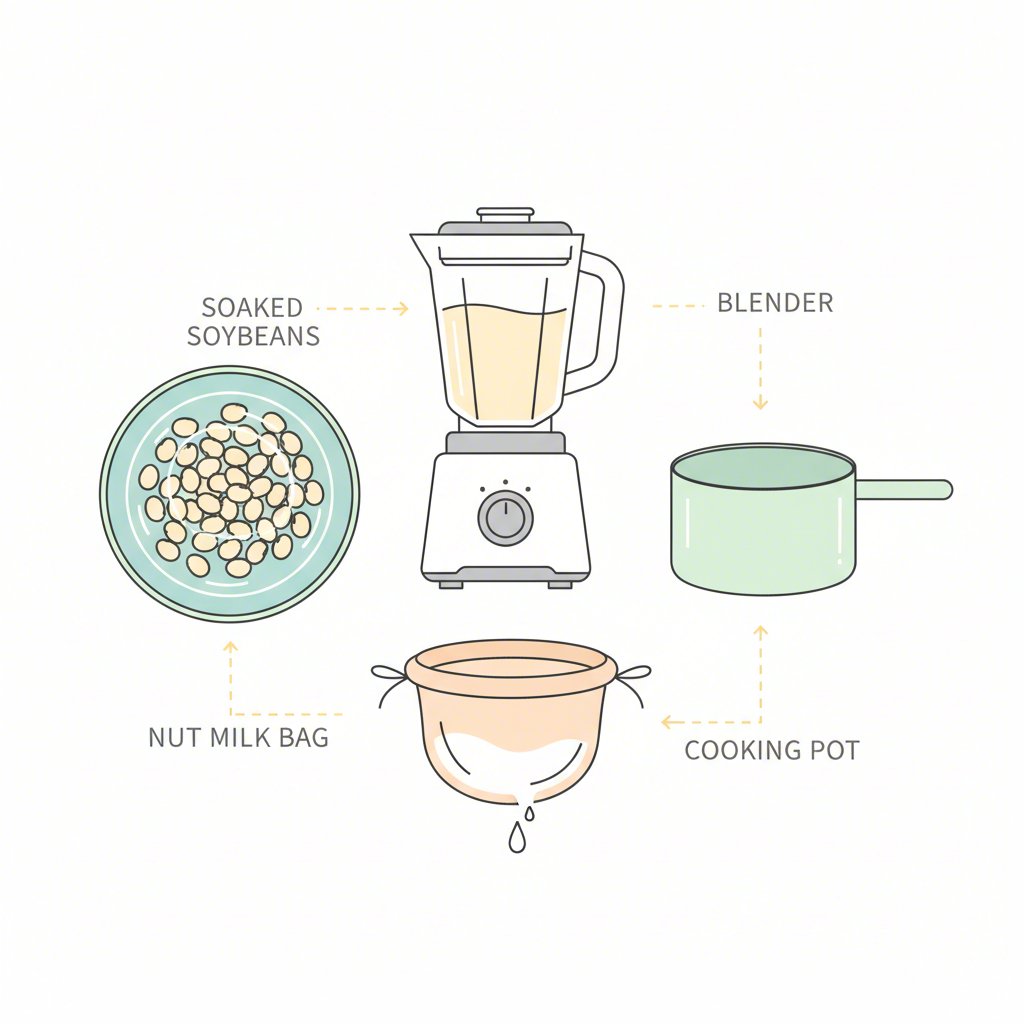
The equipment list is straightforward and consists of common kitchen tools. You will need:
- A large bowl for soaking the beans overnight.
- A high-powered blender to break down the beans into a fine puree.
- A large pot for cooking the milk. Ensure it’s big enough to prevent boiling over.
- A nut milk bag or several layers of cheesecloth for straining the pulp from the milk.
- An airtight bottle or jar for storing your finished soy milk in the refrigerator.
While a standard high-powered blender is more than capable of handling this task, some home cooks prefer dedicated machines to further simplify the process. These appliances often combine the blending, heating, and straining steps into one. For those exploring this option, Soy Milk Quick offers detailed comparisons of the best plant milk makers on the market, helping you find a model that fits your needs and budget. This can be a worthwhile investment if you plan on making plant-based milks regularly.
The Step-by-Step Process for Perfect Homemade Soy Milk
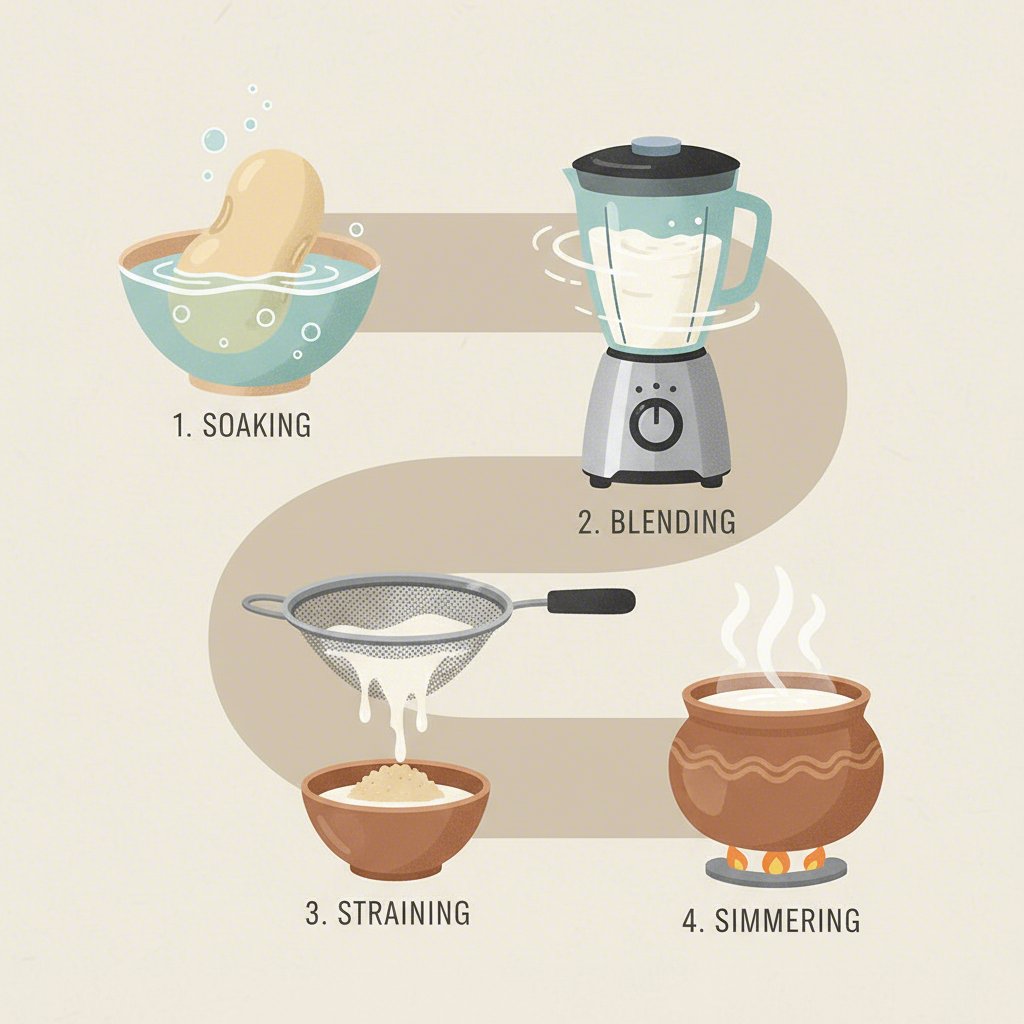
Creating your own soy milk is a rewarding four-stage process: soaking, blending, straining, and cooking. Each step is crucial for achieving a smooth texture and delicious flavor. Following these instructions carefully will help you avoid common pitfalls and produce a high-quality, fresh beverage every time. This method ensures the milk is not only tasty but also safe to consume, as raw soy milk contains compounds that are neutralized by cooking.
Here is the detailed, step-by-step guide to making your own soy milk:
- Soak the Soybeans: Place your dried soybeans in a large bowl and cover them with at least three times their volume of water. Let them soak for a minimum of 8 hours, or simply leave them overnight in the refrigerator. The beans will absorb the water and more than double in size. After soaking, some recipes suggest peeling the skins off the beans by gently rubbing them between your hands. As noted by sources like Lion Brand, this optional step can result in an even smoother, less beany-tasting milk.
- Blend the Beans with Water: Drain the soaked soybeans and rinse them well. Add the beans to a high-powered blender along with fresh, filtered water. A good starting ratio is 1 part soaked beans to about 3-4 parts water. Blend on high speed for about a minute, or until the mixture is completely smooth and creamy. You may need to do this in batches depending on the size of your blender.
- Strain the Milk: Pour the blended soybean puree through a nut milk bag or a sieve lined with a few layers of cheesecloth set over a large pot. Squeeze the bag firmly to extract all the liquid. The creamy liquid is your raw soy milk, and the pulp left behind in the bag is called okara. Don’t discard the okara; it’s packed with fiber and protein and can be used in other recipes.
- Cook the Soy Milk: This final step is non-negotiable for safety and taste. Pour the raw soy milk into the large pot and bring it to a gentle boil over medium heat, stirring constantly to prevent it from sticking to the bottom or boiling over. Once it reaches a boil, reduce the heat and let it simmer for about 15-20 minutes. During this time, skim off any foam that forms on the surface. This cooking process eliminates the raw bean flavor and makes the milk digestible.
After cooking, you can let the milk cool before transferring it to a storage container. Your homemade soy milk is now ready to be enjoyed, either plain or with your favorite flavorings.
Customizing Flavor and Troubleshooting Common Issues
One of the greatest advantages of making soy milk at home is the ability to tailor it perfectly to your taste. Unlike commercial products, your homemade version is a blank canvas. The best time to add flavorings is after the cooking process, once the milk has cooled slightly. For a touch of sweetness, consider stirring in a natural sweetener like maple syrup, agave nectar, or a few soaked and blended dates until you reach your desired level.
Beyond sweetness, you can infuse your soy milk with a variety of flavors. A splash of vanilla extract can add warmth and depth, while a pinch of salt can enhance the overall flavor profile, balancing the natural nuttiness of the soybeans. For a richer, dessert-like beverage, try whisking in some unsweetened cocoa powder to create a delicious chocolate soy milk. Experiment with different additions to find the combination you love most.
A common concern for first-time makers is the distinct “beany” taste that can sometimes be present in homemade soy milk. If you find the flavor too strong, the solution almost always lies in the cooking process. Ensuring you simmer the milk for the full 15-20 minutes is crucial for neutralizing these raw flavors. Additionally, taking the time to peel the skins from the soybeans after soaking can also contribute to a milder, cleaner taste. Don’t be discouraged if your first batch isn’t perfect; proper cooking is key.
After straining your milk, you’ll be left with a soft, damp pulp known as okara. It would be a shame to waste this nutritious byproduct. Okara is rich in protein and fiber and has a very mild taste, making it incredibly versatile. You can store it in the fridge for a few days or freeze it for later use. Here are a few simple ideas for using okara:
- Add it to pancake or waffle batter for a protein boost.
- Mix it into veggie burger patties or meatballs as a binder.
- Incorporate it into baked goods like muffins and bread.
- Stir it into soups or stews to add thickness and nutrients.
Storing and Using Your Fresh Soy Milk
Proper storage is key to keeping your homemade soy milk fresh and delicious. Once it has cooled completely, pour the milk into a clean, airtight glass bottle or jar. Store it in the coldest part of your refrigerator, which is typically at the back rather than in the door. Because it contains no preservatives, homemade soy milk has a much shorter shelf life than store-bought varieties. It will typically stay fresh for 3 to 5 days. As noted by Alphafoodie, you’ll know it’s past its prime if it develops a sour smell or taste.
It’s completely normal for homemade soy milk to separate in the fridge, with a thicker layer forming at the bottom. This happens because there are no emulsifiers or gums, which are often found in commercial products to maintain a uniform consistency. Simply give the bottle a good shake before each use to recombine everything.
Many people wonder if the effort of making their own soy milk is worthwhile. The answer often depends on your priorities. Making it yourself is significantly cheaper than buying it, especially if you purchase dried soybeans in bulk. It also gives you complete control over the ingredients, allowing you to create a pure, additive-free product. However, it does require a bit of time and planning. Here’s a quick comparison:
Pros
- Cost-Effective: Dried soybeans are inexpensive, making it much cheaper per serving.
- No Additives: You control what goes in—no gums, thickeners, or artificial flavors.
- Fresh Taste: The flavor is fresh, creamy, and noticeably different from packaged versions.
- Reduces Waste: You avoid throwing away cartons and can use the leftover okara.
Cons
- Time-Consuming: The process involves soaking, blending, straining, and cooking.
- Shorter Shelf Life: It only lasts for 3-5 days in the refrigerator.
- Requires Planning: You need to remember to soak the beans in advance.
Once you have your fresh soy milk, the uses are endless. Enjoy it cold in a glass, pour it over your morning cereal or granola, blend it into smoothies for a protein boost, or use it as a dairy-free substitute in baking, sauces, and soups. It also works beautifully in coffee and tea.
Frequently Asked Questions
1. How do you make easy soy milk?
Making easy soy milk involves four basic steps. First, soak dried soybeans in water overnight. Next, drain the beans and blend them with fresh water until smooth. After that, strain the mixture through a nut milk bag or cheesecloth to separate the liquid milk from the pulp (okara). Finally, cook the raw milk by bringing it to a boil and then simmering it for 15-20 minutes to make it safe to drink and improve its flavor.
2. Is it cheaper to make your own soy milk?
Yes, it is generally much cheaper to make your own soy milk. The primary ingredient, dried soybeans, is very inexpensive, especially when bought in bulk. While there is a time commitment involved in the process, the cost of ingredients per liter of homemade soy milk is significantly lower than the price of most store-bought cartons.
3. Is it worth making your own soy milk?
Whether it’s worth it depends on your priorities. If you value fresh taste, want to avoid additives and preservatives, and are looking to save money on groceries, then making your own soy milk is definitely worthwhile. It provides a more nutritious and flavorful product. However, it does require more time and effort than simply buying it from the store, and it has a shorter shelf life.
go53vo