TL;DR
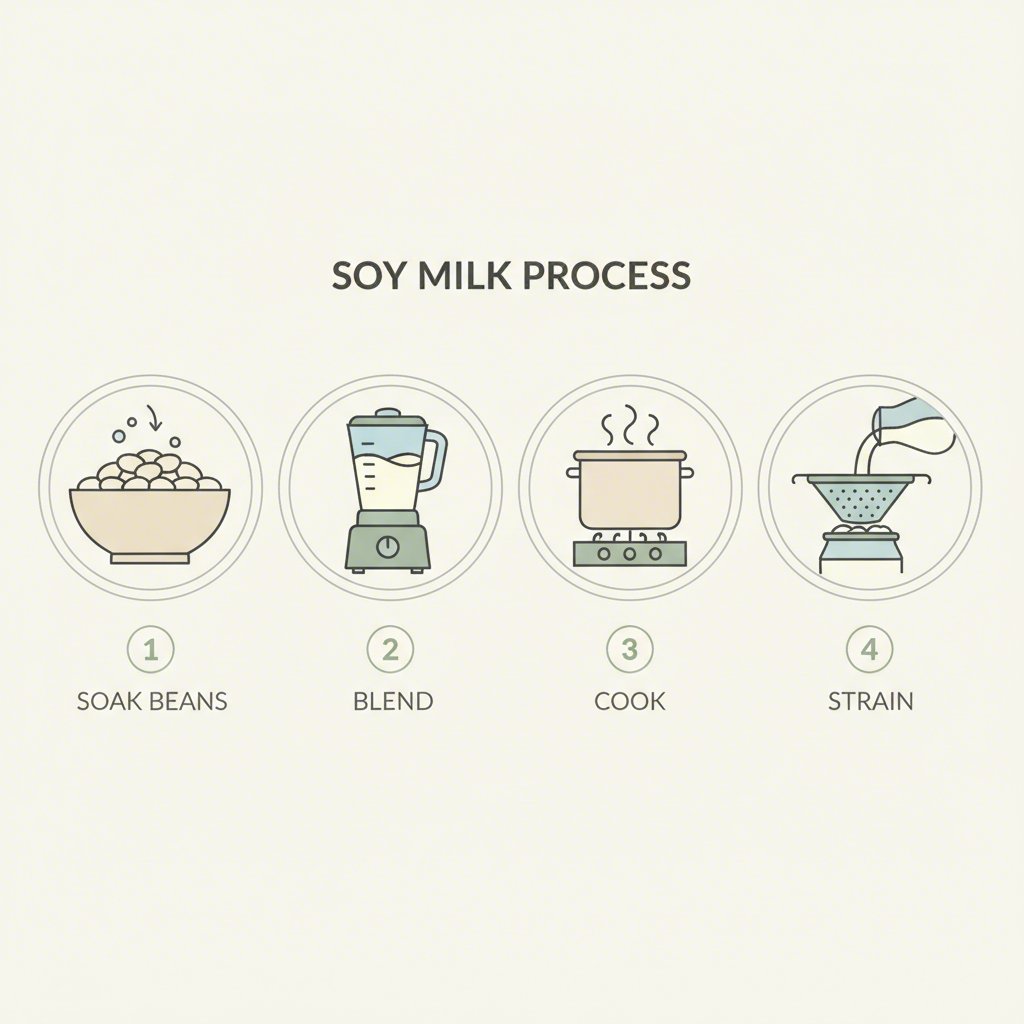
Making delicious soy milk from soybeans is a simple four-step process: soak the dried beans, blend them with water, cook the mixture thoroughly, and strain it to get a smooth, creamy liquid. This method gives you fresh, additive-free milk and is much more cost-effective than buying it from a store. The key to a great taste is soaking the beans for at least 8 hours and simmering the milk for 15-20 minutes to eliminate any raw, beany flavor.
The Complete Step-by-Step Process for Making Soy Milk
Crafting your own soy milk at home is an empowering and straightforward process that rewards you with a fresh, pure product free from the preservatives and thickeners often found in commercial versions. The entire method can be broken down into four essential stages: soaking, blending, cooking, and straining. Understanding the ‘why’ behind each step will help you perfect your technique and customize the milk to your liking.
The first and most crucial step is soaking. Dried soybeans need to be rehydrated for at least 8 to 12 hours. This long soak does more than just soften the beans for blending; it also helps neutralize phytic acid, making the nutrients in the soy milk easier for your body to absorb, as noted in a guide from Alphafoodie. After soaking, the beans will have nearly tripled in size and will be ready for the next stage.
Next comes blending. You’ll combine the soaked, rinsed beans with fresh water in a high-speed blender. The ratio of beans to water will determine the final consistency of your milk. For a richer, creamier milk, a lower water ratio is ideal, while more water will produce a lighter beverage. While a powerful blender is all you need, if you plan on making plant-based milks regularly, you might consider a dedicated machine. For those exploring their options, Soy Milk Quick offers detailed comparisons of the best plant milk makers to help find the right fit for your kitchen.
Cooking is a non-negotiable step that transforms the raw bean puree into digestible, pleasant-tasting milk. The blended mixture must be brought to a boil and then simmered gently for about 15 to 20 minutes. According to experts at Serious Eats, this cooking process is what eliminates the grassy, raw flavor characteristic of uncooked soybeans. During this time, you may notice a foam forming on the surface, which should be skimmed off for a cleaner taste.
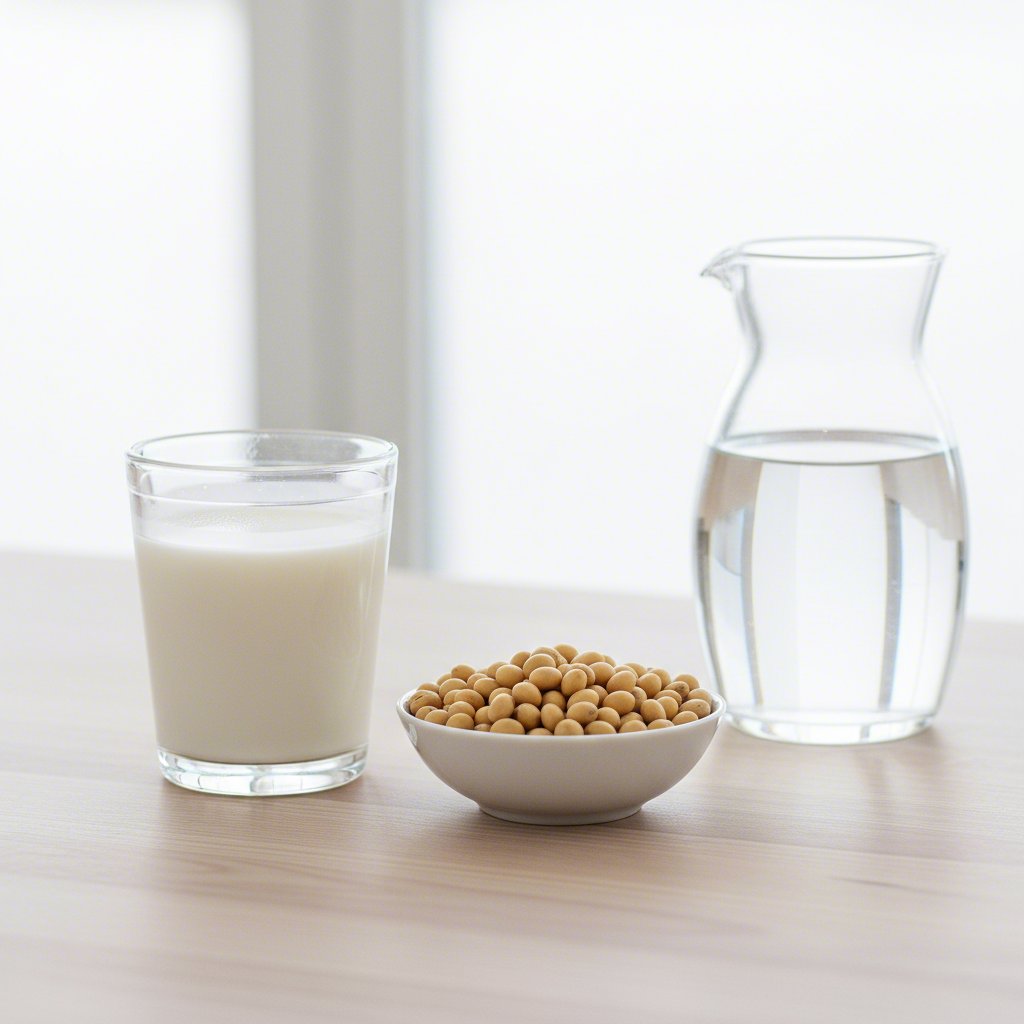
Finally, the cooked mixture is strained to separate the smooth milk from the soybean pulp, known as okara. A nut milk bag or a fine-mesh sieve lined with cheesecloth is perfect for this. Squeeze firmly to extract every last drop of creamy milk. For an even smoother final product, some recipes suggest peeling the skins off the soybeans after soaking, a tip that adds a few extra minutes but can significantly improve the texture.
To help you get started, here is a simple comparison of soybean-to-water ratios from different sources:
| Source | Ratio (Dried Beans to Water) | Resulting Consistency |
|---|---|---|
| Serious Eats | 1 cup beans to 3.5 cups water | Rich and creamy |
| Alphafoodie | 1 cup beans to 8 cups water | Lighter and thinner |
| Forks Over Knives | 2.5 cups beans to 16 cups water (approx. 1:6.4 ratio) | Medium-bodied |
Here is the complete process in a simple, numbered list:
- Soak: Rinse 1 cup of dried soybeans and soak them in a large bowl with plenty of water for 8-12 hours, or overnight.
- Rinse & Peel (Optional): Drain and rinse the soaked beans. For smoother milk, gently rub the beans between your hands to remove the skins.
- Blend: Add the soaked beans and 4-8 cups of fresh water (depending on desired creaminess) to a high-speed blender. Blend until completely smooth.
- Cook: Pour the blended mixture into a large pot. Bring it to a boil over medium heat, then reduce the heat and simmer for 15-20 minutes, stirring occasionally to prevent sticking and skimming off any foam.
- Strain: Let the mixture cool slightly. Pour it through a nut milk bag or cheesecloth-lined strainer set over a large bowl. Squeeze well to extract all the milk.
- Store: Transfer the fresh soy milk to a sealed bottle or jar and store it in the refrigerator for up to 5 days.
How to Improve Taste and Avoid the ‘Beany’ Flavor
One of the most common concerns for those new to making soy milk is the distinctive ‘beany’ or grassy flavor that can be present in homemade versions. Fortunately, this is an easy issue to solve, and you have complete control over the final taste. With a few simple techniques, you can produce soy milk that is sweet, clean, and far superior to many store-bought options.
The single most important step for eliminating that raw flavor is proper cooking. As highlighted in a guide from Forks Over Knives, simmering the blended soy milk for at least 15 minutes is essential to make it digestible and to cook off the enzymes responsible for the undesirable taste. Rushing this step will almost certainly result in a grassy-tasting milk, so patience is key. Skimming the foam that rises to the surface during boiling also helps achieve a cleaner flavor.
Once the milk is cooked, you can customize it with natural sweeteners and flavorings. Unlike commercial soy milk, which can be overly sweet or contain artificial additives, your homemade version is a blank canvas. It’s best to add these flavorings after the cooking process is complete so their delicate notes aren’t boiled away.
Here are some excellent options for enhancing your soy milk:
- Natural Sweeteners: For a touch of sweetness, try blending in one or two pitted Medjool dates, a teaspoon of maple syrup, or a bit of agave nectar per quart of milk.
- A Pinch of Salt: Just a tiny pinch of sea salt can enhance the overall flavor and sweetness of the milk without making it salty.
- Vanilla Extract: A half-teaspoon of pure vanilla extract adds a warm, familiar flavor that makes the soy milk incredibly versatile for use in coffee, cereal, or on its own.
- Spices: A dash of cinnamon or a sprinkle of nutmeg can create a cozy, spiced version perfect for colder months.
By making soy milk at home, you get to decide exactly what goes into it. This control is a significant advantage over store-bought alternatives, which often contain thickeners like carrageenan, preservatives, and added sugars. Your homemade milk will be fresher, purer, and tailored perfectly to your taste preferences.
A Zero-Waste Bonus: What to Do with Leftover Soybean Pulp (Okara)
After you’ve strained your freshly made soy milk, you’ll be left with a soft, crumbly pulp in your nut milk bag or cheesecloth. This byproduct is called okara, and it would be a mistake to throw it away. Okara is a nutritional powerhouse, packed with fiber, protein, and minerals. Embracing a zero-waste approach in the kitchen is not only economical and environmentally friendly but also introduces you to versatile new ingredients.
Okara has a very mild, slightly nutty flavor, which means it can be easily incorporated into a wide variety of both sweet and savory dishes. It acts as a wonderful texturizer and nutrient booster. As noted by Lion Brand, it’s considered a ‘super food’ that readily absorbs the flavors of whatever it’s cooked with, making it incredibly versatile. You can use it fresh or dry it out for longer storage by baking it on a low heat until it resembles breadcrumbs.
Thinking of okara as a bonus ingredient rather than waste opens up a world of culinary possibilities. It’s a fantastic way to add substance and nutrition to meals while making the most of your soybeans. Instead of heading for the compost bin, your leftover pulp can become the star of another delicious creation.
Here are some creative and practical uses for your leftover okara:
- Boost Baked Goods: Add moistness and fiber to muffins, breads, cookies, and brownies by substituting a portion of the flour with fresh okara.
- Make Veggie Burgers and Meatballs: Use okara as a binder and base for homemade veggie patties or meatless meatballs. Its texture helps hold everything together while adding protein.
- Enrich Soups and Stews: Stir a few spoonfuls of okara into soups, stews, or curries to act as a natural, nutritious thickener.
- Create a Savory Scramble: Sauté okara with onions, garlic, and your favorite vegetables for a protein-rich scramble similar to a tofu scramble.
- Make Okara Granola: Mix okara with oats, nuts, seeds, and a sweetener like maple syrup, then bake until golden brown for a crunchy, high-fiber granola.
Frequently Asked Questions
1. Do you need to soak soybeans before making soy milk?
Yes, soaking is an essential step. Soaking dried soybeans for at least 8 hours rehydrates them, which results in a much creamier and smoother milk. More importantly, it helps to neutralize phytic acid, an enzyme inhibitor that can make nutrients harder for your body to absorb. Soaking ensures your soy milk is not only delicious but also more digestible.
2. How many soybeans does it take to make a gallon of soy milk?
The amount can vary based on how creamy you like your milk, but a good general estimate is that one pound of dried soybeans will yield approximately 1.5 to 1.8 gallons of soy milk. A single cup of dried soybeans, which is roughly half a pound, will typically produce between 0.5 and 1 gallon, depending on the amount of water you add during the blending process.