TL;DR
Tired of that grassy, beany taste in your homemade soy milk? The secret is to neutralize an enzyme in the soybeans called lipoxygenase before it can create those off-flavors. You can achieve this with a few simple but crucial heat-based techniques. The most effective methods involve soaking and peeling the beans, blending them with boiling water, and then simmering the finished milk to ensure a smooth, creamy, and delicious result every time.
Understanding the ‘Beany’ Taste: The Science of Soy
The characteristic ‘beany’ or sometimes bitter flavor of homemade soy milk isn’t just a matter of opinion; it’s a direct result of a specific chemical reaction. The culprit is an enzyme naturally present in soybeans called lipoxygenase. When raw, soaked soybeans are broken down in the presence of water and oxygen at room temperature—as happens in a blender—this enzyme rapidly goes to work, producing the compounds responsible for that undesirable grassy taste. Understanding this process is the first step to conquering it.
Fortunately, lipoxygenase is sensitive to heat. By applying heat at the right stage, you can deactivate the enzyme and prevent it from ever creating the beany flavor. This is the scientific principle behind every successful homemade soy milk recipe. As explained by food science resources like Kvalifood, heating the beans before they are extensively broken down and exposed to oxygen is the key. This insight led to the development of methods specifically designed to introduce heat early in the process.
One of the most effective techniques, often referred to as the ‘Cornell process,’ involves grinding the soaked soybeans directly with boiling water. This method, highlighted by home cooks at VeganYumYum, ensures the lipoxygenase enzyme is neutralized almost instantly as the beans are pulverized. This ‘hot blend’ approach is far superior to a ‘cold blend’ method, where beans are mixed with room-temperature water, allowing the beany flavor to develop fully before the milk is eventually cooked. By embracing the science, you can choose a preparation method that guarantees a cleaner, more pleasant taste from the start.
Phase 1: Essential Soybean Preparation Techniques
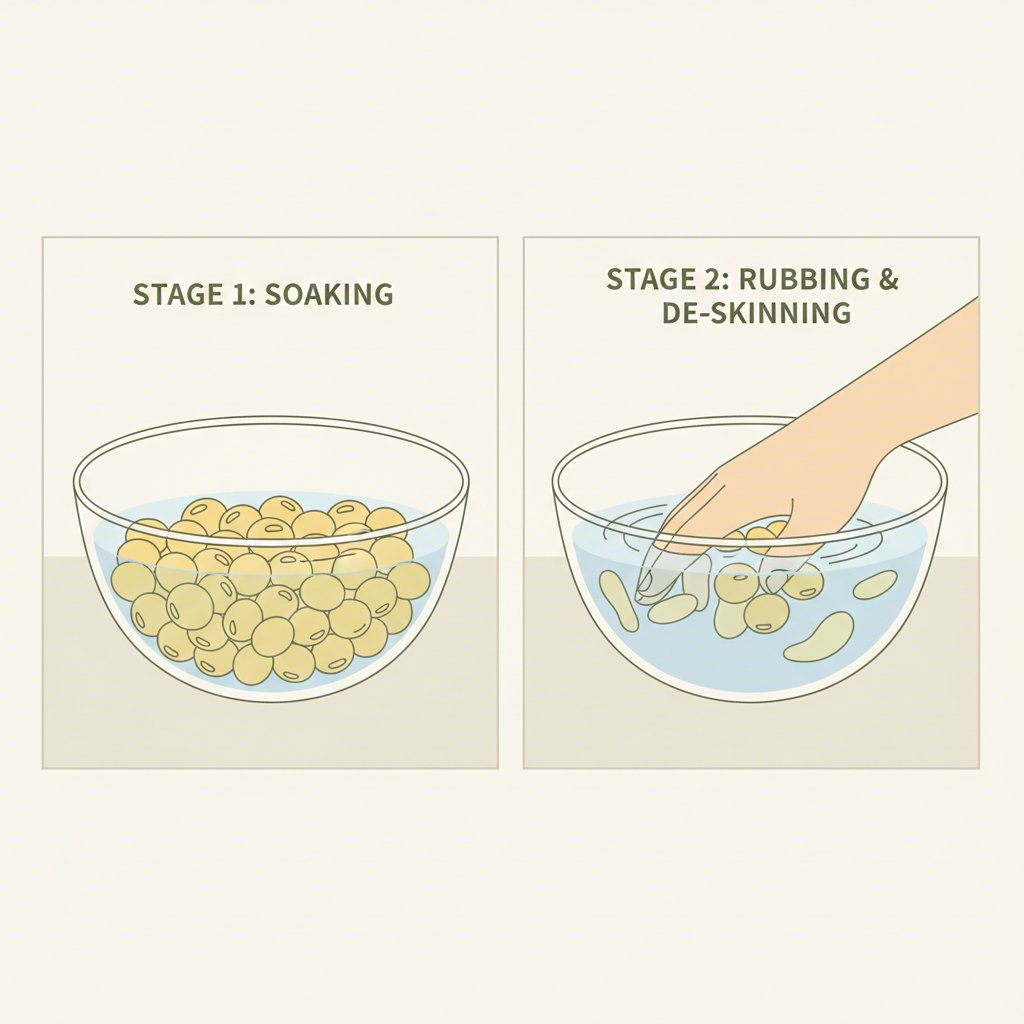
Your journey to delicious, non-beany soy milk begins long before you turn on the blender. Proper preparation is your first and most critical line of defense. This phase focuses on two key actions: soaking and peeling. Soaking not only softens the beans for easier blending but also begins the process of cleaning them and reducing unwanted compounds. Most guides recommend soaking the beans for at least 8-12 hours in plenty of water. It’s a good practice to change the water once or twice during a long soak to keep it fresh.
Once the beans are fully hydrated, the next crucial step is removing the skins. While this can seem tedious, many home soy milk makers swear by it. The skins can contribute to the beany flavor and a slightly gritty texture. A simple and effective method described by Gurme Vegan is to place the soaked beans in a large bowl of water and rub them vigorously between your palms. The skins will loosen and float to the surface, where they can be easily skimmed off. This extra effort pays off significantly in the final taste.
Here’s a simple step-by-step guide to effective soaking and peeling:
- Rinse and Sort: Start by rinsing your dry soybeans and picking out any discolored or broken ones.
- Soak: Place the beans in a large bowl and cover them with at least three times their volume in cool, filtered water. Let them soak overnight, or for 8-12 hours. If soaking for longer, place them in the refrigerator.
- Drain and Rinse: Pour off the soaking water and rinse the plump beans thoroughly under fresh water.
- Peel the Beans: Submerge the soaked beans in a large bowl of water. Gently squeeze and rub handfuls of beans together. The transparent skins will separate and float.
- Skim the Skins: Agitate the water and skim the floating skins off the surface with a small sieve or slotted spoon. Repeat until most of the skins are removed. Don’t worry about getting every single one.
Deciding whether to peel the soybeans is a common question. While it adds time to the process, the benefits are clear for those sensitive to the beany taste. Here’s a quick comparison:
| Technique | Pros | Cons |
|---|---|---|
| Peeling Soybeans | Significantly reduces beany flavor; results in a smoother, creamier milk. | Time-consuming and can be a bit messy. |
| Leaving Skins On | Much faster and simpler preparation. | Can result in a stronger beany taste and a slightly grainier texture. |
Phase 2: Mastering the Cooking and Blending Process
With your beans prepped, it’s time to apply the most powerful tool in your arsenal: heat. This is the phase where you actively destroy the lipoxygenase enzyme. There are two primary methods to achieve this, both centered on introducing high temperatures before or during blending. Your choice may depend on the type of blender you own and your personal preference for workflow.
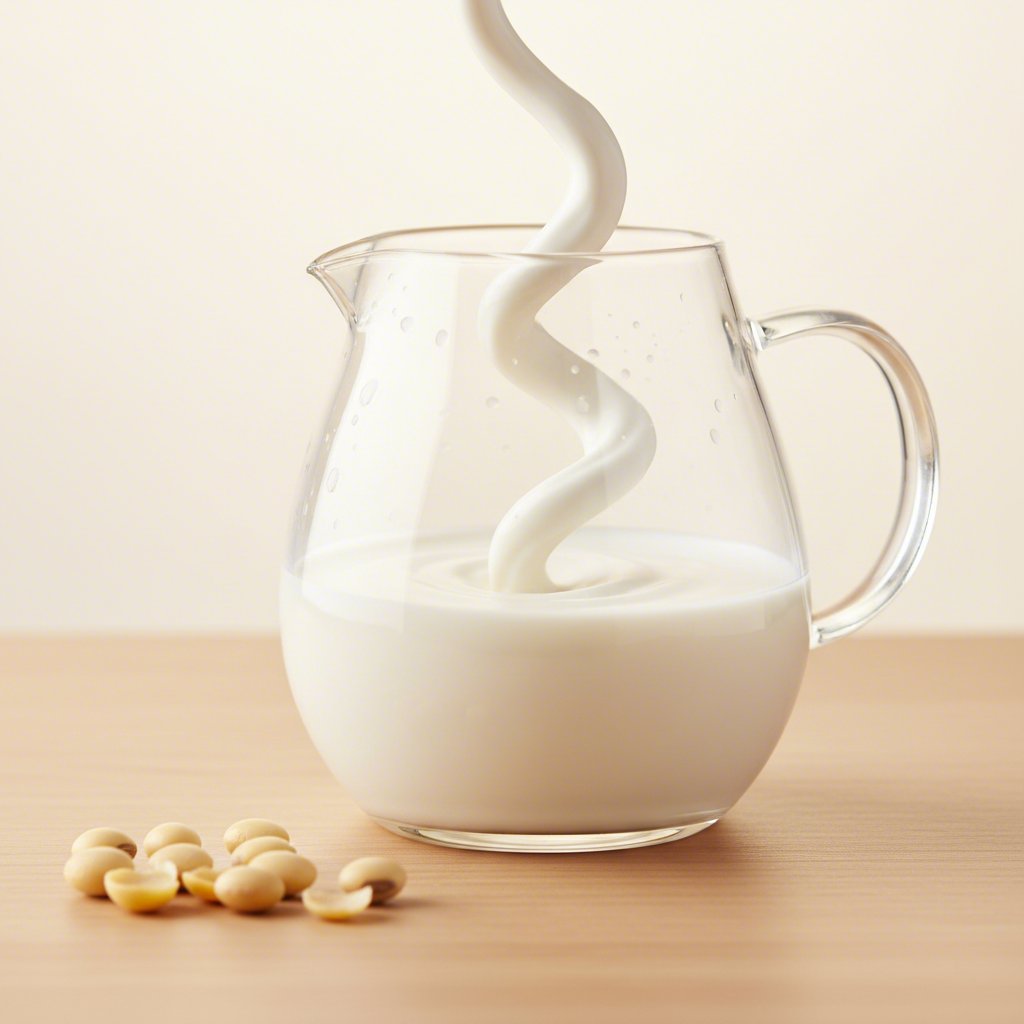
The first and highly recommended technique is the Hot Water Blending Method. This involves blending your soaked and peeled soybeans directly with boiling or just-off-the-boil water. As detailed in recipes from Wonderland Kitchen, this approach instantly deactivates the enzymes as the beans are broken apart. This method requires a powerful blender that is rated for handling hot liquids, such as a Vitamix or Blendtec. If you’re using a standard blender, be extremely cautious, as hot liquids can create pressure and potentially damage the machine or cause injury.
The second technique is the Pre-Heating Method. In this approach, you heat the soaked beans in water before you blend them. A common target is to bring the beans and water to a temperature of around 180°F (82°C) and hold it for a few minutes before transferring the mixture to the blender. This is a safer option for standard blenders as the liquid isn’t at a full boil. While it adds an extra step, it is just as effective at neutralizing the enzyme. Regardless of the blending method, the final step is always to cook the strained milk. Simmering the soy milk for 20-30 minutes is essential to cook it fully, improve the flavor, and ensure it’s safe to drink.
For those who make plant-based milks frequently, investing in a dedicated machine can streamline this entire process. Looking to craft fresh, additive-free plant-based milks right in your kitchen? Soy Milk Quick offers an expert, comprehensive guide to the best plant milk makers for every need and budget, featuring detailed comparisons, pros, and cons. Discover models with fast processing, quiet operation, or large capacities to ensure you find the perfect machine for delicious homemade almond, oat, soy, and more.
Here is a step-by-step guide for the popular Hot Water Blending Method:
- Prepare Your Blender: Ensure your blender is clean and can safely handle hot liquids.
- Boil Water: Bring a kettle of filtered water to a rolling boil.
- Combine Ingredients: For every 1 cup of soaked, peeled soybeans, add 3 to 4 cups of the boiling water to your blender carafe.
- Blend on High: Secure the lid tightly, and if your blender has a vented lid cap, remove it and cover the opening with a folded kitchen towel to allow steam to escape. Start on low speed and quickly ramp up to high. Blend for at least 2 minutes until the mixture is completely smooth and pulverized.
- Strain Thoroughly: Pour the blended mixture through a nut milk bag or several layers of cheesecloth set over a large pot. Squeeze firmly to extract all the liquid, leaving behind the pulp (okara).
- Cook the Milk: Bring the strained milk to a gentle simmer over medium heat. Reduce the heat and cook for 20-30 minutes, stirring occasionally and skimming any foam that forms on the surface. Be careful, as soy milk can boil over easily.
Phase 3: Flavoring and Finishing for a Delicious Taste
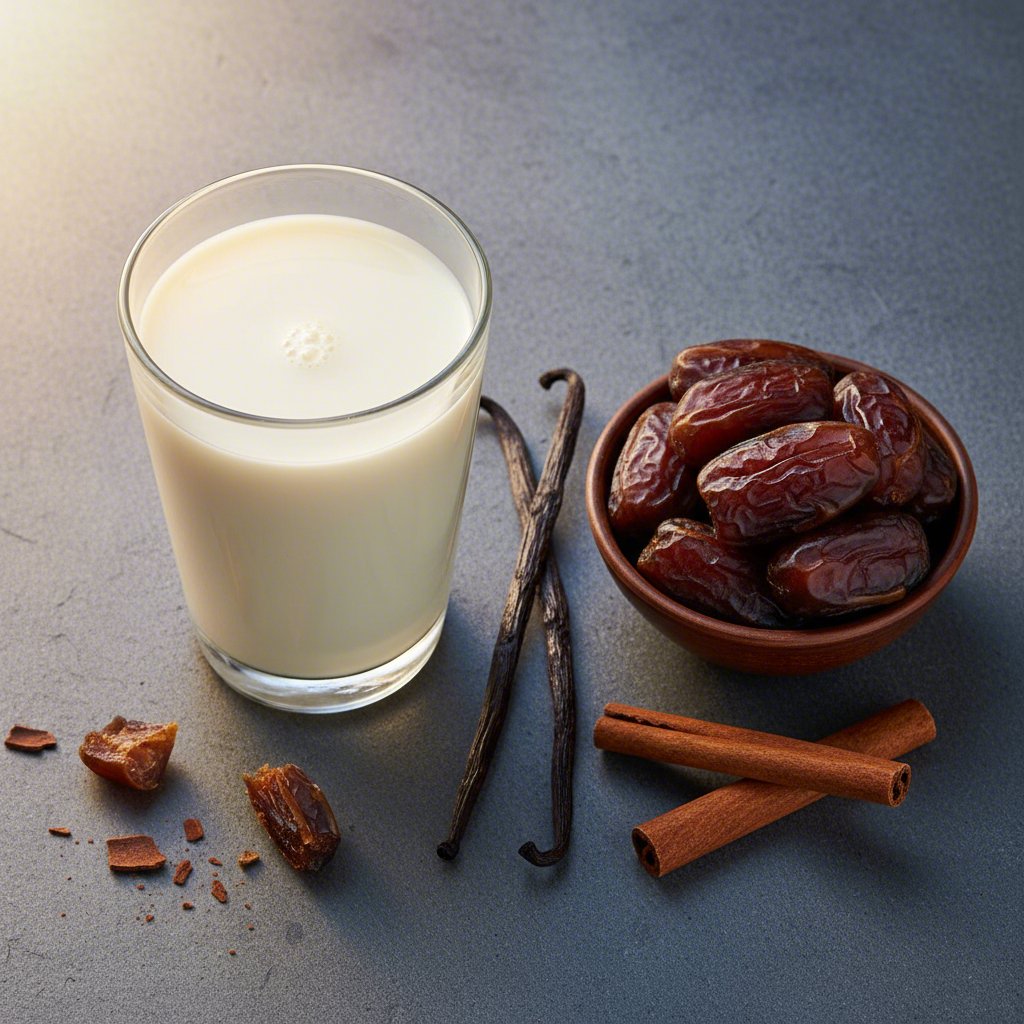
Even after you’ve mastered the technique to eliminate the beany taste, the final step is to transform your neutral-tasting soy milk into a truly delicious beverage. This is where you can customize the flavor to perfectly match your preferences, elevating it from a simple homemade product to something that rivals, or even surpasses, store-bought versions. A few simple additions, added after the final cooking stage, can make all the difference.
The most common starting point is adding a touch of sweetness and a hint of salt. A pinch of salt enhances the overall flavor profile and balances the sweetness. For sweeteners, you have many options beyond plain sugar. Natural choices like maple syrup, agave nectar, or pureed dates can add both sweetness and a subtle depth of flavor. Start with a small amount, such as one tablespoon of liquid sweetener per liter of milk, and adjust until you find your perfect level.
Beyond basic sweetening, you can get creative with extracts and spices to craft unique flavor profiles. A dash of vanilla extract is a classic choice that lends a warm, familiar aroma and taste. However, don’t be afraid to experiment. As suggested by the chefs at Rouxbe Online Culinary School, whole spices can infuse your milk with incredible character. Adding a vanilla bean, a cinnamon stick, or a few green cardamom pods during the final simmering stage will create a beautifully aromatic and sophisticated drink.
Consider these flavor profiles as inspiration:
- Classic & Sweet: A teaspoon of vanilla extract and a tablespoon of maple syrup. Simple, elegant, and perfect for cereal or coffee.
- Spiced Chai: A cinnamon stick, 2-3 whole cloves, and a few crushed green cardamom pods simmered with the milk. Strain before chilling.
- Rich & Creamy: Blend in one or two soaked and pitted dates for natural sweetness and a thicker texture.
- Simply Pure: For a versatile milk perfect for savory cooking, add nothing more than a small pinch of salt to enhance its natural flavor.
Always add flavorings after the main cooking process is complete. This ensures their delicate flavors aren’t diminished by prolonged boiling. Once flavored, allow the milk to cool completely before transferring it to a sealed glass container for storage in the refrigerator. It should stay fresh for about 4-5 days.
Final Thoughts on Your Soy Milk Journey
Making soy milk at home that is free from any beany aftertaste is not just possible—it’s a rewarding and achievable process. By understanding the simple science of the lipoxygenase enzyme and using heat as your ally, you can consistently produce a beverage that is fresh, creamy, and delicious. The key lies in a methodical approach: careful preparation through soaking and peeling, strategic blending with heat, and thorough cooking.
Each batch is an opportunity to refine your technique and customize the final product to your exact liking. Whether you prefer it subtly sweet with a hint of vanilla or pure and unadorned for savory dishes, you are in complete control of the ingredients and the outcome. Embrace the process, and you’ll soon find that the best-tasting soy milk is the one you make yourself, right in your own kitchen.
Frequently Asked Questions
1. How do you remove the beany taste from soy milk?
The most effective way to remove the beany taste is to deactivate the lipoxygenase enzyme with heat before it can create off-flavors. This involves several key steps: soaking the soybeans overnight, peeling off their skins, blending the beans with boiling water, and finally, simmering the strained milk for at least 20 minutes. Adding a pinch of salt and a natural sweetener like maple syrup can also help mask any subtle remaining flavors.
2. Why does my homemade soy milk taste like beans?
That distinct beany flavor is caused by an enzyme called lipoxygenase, which is naturally present in soybeans. When the beans are ground with room-temperature water, this enzyme is exposed to oxygen and rapidly produces the compounds that give the milk a grassy or beany taste. To prevent this, the beans must be heated either right before or during the blending process to neutralize the enzyme, resulting in a much cleaner and more pleasant flavor.
What is the ideal strength of finished soy milk. Started with 1/2 cup bean equals cups of finished soy milk?.