
TL;DR
To successfully steam soy milk for lattes, start with a cold, fresh barista-blend soy milk for the best results. Aerate the milk by placing the steam wand tip just below the surface for 3-5 seconds to introduce air. Then, submerge the wand deeper to create a swirling vortex that integrates the air, creating a silky microfoam. Heat the milk to around 140°F (60°C), but avoid going much higher to prevent curdling.
The Step-by-Step Guide to Steaming Perfect Soy Milk
Achieving that creamy, velvety microfoam with soy milk is a skill that can elevate your homemade lattes from good to exceptional. Unlike dairy milk, soy milk has a different protein and fat composition, which requires a slightly adjusted technique. Mastering this process is about controlling two key factors: aeration and temperature. Follow these steps to get a consistently smooth texture perfect for latte art and delicious drinks.
Here is a detailed breakdown of the process using a traditional espresso machine steam wand:
- Start with Cold, Fresh Milk. Always use soy milk straight from the refrigerator. As noted in a guide from Home Cafe by Charlie, cold milk incorporates air more effectively, giving you more time to work with it before it gets too hot. Pour the desired amount into a cold metal milk pitcher.
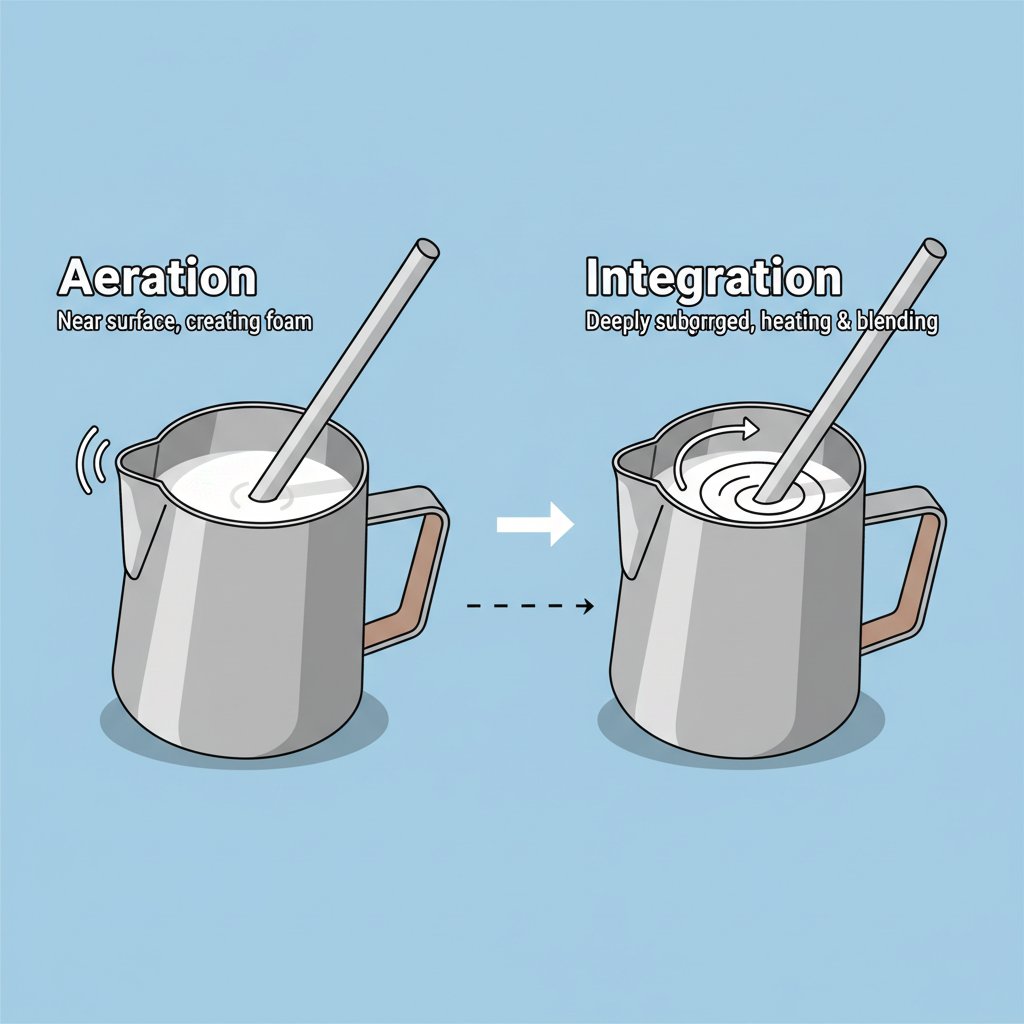
- Position the Steam Wand. Before turning on the steam, purge the wand to clear out any residual water. Position the tip of the wand just below the surface of the soy milk, slightly off-center. This angle is crucial for starting the whirlpool motion, or vortex, later on.
- Aerate for a Few Seconds. Turn the steam wand on to full power. You should hear a gentle hissing or tearing sound as air is introduced into the milk. This aeration phase should be brief—typically just 3 to 5 seconds. The goal is to add just enough air to create foam; too much will result in large, undesirable bubbles.
- Submerge and Create the Vortex. After the initial aeration, lower the pitcher slightly (or raise the wand deeper into the milk) to stop the hissing sound. Keep the wand tip submerged and off-center to encourage the milk to spin in a vortex. This motion breaks down larger bubbles and integrates the air, creating a uniform, silky microfoam.
- Monitor the Temperature Carefully. Temperature is the most critical factor in preventing curdling. The ideal range is between 130-150°F (55-65°C), as suggested by Pesado 58.5. Some sources, like Seattle Coffee Gear, note it can be heated up to 149°F. However, if you’ve experienced issues, you might follow the more cautious advice from Espresso Coffee Snobs and aim for a lower temperature of around 120°F (49°C). Stop steaming when the outside of the pitcher becomes too hot to comfortably touch.
- Polish Your Milk. Once you’ve reached the target temperature, turn off the steam wand and remove it from the pitcher. Immediately wipe the wand with a damp cloth. If you see any large bubbles on the surface of your milk, tap the pitcher firmly on the counter a few times. Finish by gently swirling the milk in the pitcher to create a glossy, paint-like texture. It’s now ready to pour into your espresso.
Choosing the Right Soy Milk: Barista Blends vs. Regular
Not all soy milks are created equal, especially when it comes to steaming. The secret to achieving café-quality foam often lies in the carton you choose. While you can attempt to steam any soy milk, you’ll find that products specifically labeled as “barista blend” or “barista series” perform significantly better. These formulations are designed to withstand the heat and pressure of a steam wand.
The primary difference is the addition of stabilizers and emulsifiers. As explained by experts at Pesado 58.5, ingredients like sunflower lecithin are added to help create and maintain a stable microfoam. These agents prevent the milk from separating or creating large, airy bubbles, instead promoting the tight, silky texture needed for lattes. Regular soy milk often lacks these additives, resulting in a thin, watery foam that collapses quickly or, worse, curdles when heated.
To help you decide, here is a simple comparison between the two types:
| Feature | Barista Blend Soy Milk | Regular Soy Milk |
|---|---|---|
| Foam Stability | Excellent; holds its structure well for latte art. | Poor; foam is often thin and dissipates quickly. |
| Texture | Creates a smooth, velvety microfoam. | Can be watery or produce large, airy bubbles. |
| Curdling Risk | Lower risk due to added stabilizers. | Higher risk of curdling or separating when heated. |
| Cost | Generally more expensive. | More affordable and widely available. |
For consistent and reliable results, investing in a barista blend is highly recommended. Also, always use the freshest soy milk possible, as older milk tends to lose its ability to foam well. When in doubt, check the ingredient list for those key emulsifiers that make all the difference.
Troubleshooting Common Issues: Curdling, Bubbles, and Watery Foam
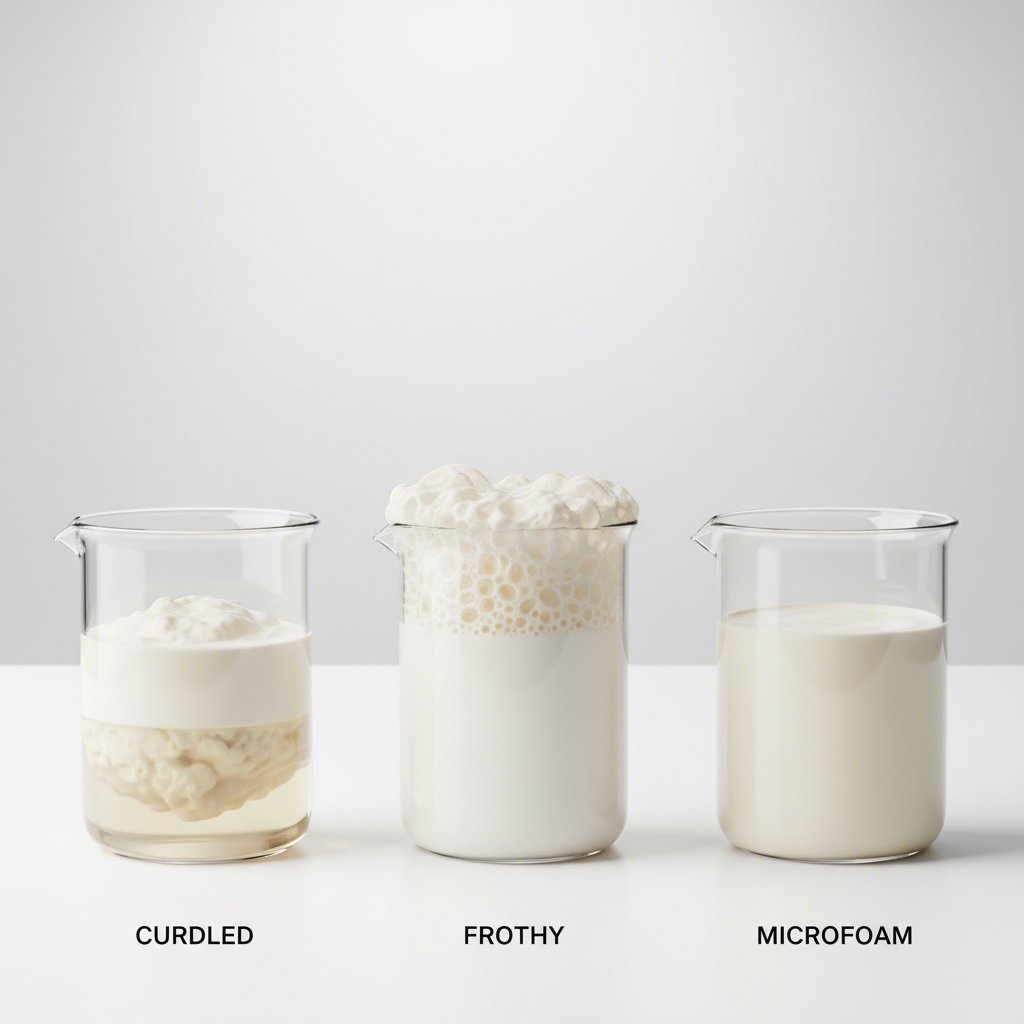
Steaming soy milk can be a bit of a learning curve, and it’s common to encounter a few frustrating issues along the way. Whether your milk is curdling, forming giant bubbles, or turning out thin and watery, there’s usually a simple fix. Understanding the cause of each problem is the first step toward perfecting your technique.
Why Is My Soy Milk Curdling?
Curdling, or separation, is the most common complaint. It happens when the proteins in the soy milk denature and clump together, creating a grainy, unpleasant texture. This is typically caused by two things: excessive heat or high acidity.
- Solution for Heat: Keep a close eye on your temperature. Do not let the milk exceed 150°F (65°C). Stop steaming as soon as the pitcher feels very warm to the touch. Using a thermometer can help you dial in the exact temperature.
- Solution for Acidity: Highly acidic coffees can cause soy milk to curdle upon contact. If you’re struggling with separation, try pairing your soy latte with a darker roast, lower-acidity coffee bean.
How Do I Get Rid of Large Bubbles?
Large, soap-like bubbles are a sign of improper aeration. This usually means you’ve introduced too much air, or introduced it too quickly, at the beginning of the steaming process.
- Solution: Reduce your aeration time to just a few seconds. The goal is a short, controlled hiss. After steaming, give the pitcher a firm tap on the counter to break up any large bubbles on the surface. Follow this with a gentle swirl to integrate the foam back into the milk.
Why Is My Foam Watery?
A thin, watery texture means not enough air was incorporated into the milk, or the air wasn’t properly mixed to create microfoam. This can happen if the steam wand is submerged too deeply from the start or if there isn’t a strong enough vortex.
- Solution: Ensure the steam wand tip is just below the surface during the initial aeration phase. You need to hear that distinct hissing sound. After aerating, make sure you establish a strong, swirling vortex to break the air down into fine bubbles. Using a high-quality steam wand with sufficient pressure also makes a significant difference.
Steaming Without a Steam Wand: Alternative Methods
While a steam wand is the gold standard for creating true microfoam, you don’t need an expensive espresso machine to enjoy a frothy soy latte at home. Several accessible methods can help you create a pleasant foam using common kitchen tools. The texture will be slightly different—often lighter and more airy than steamed microfoam—but the result is still delicious.
Before you begin with any of these methods, gently heat your soy milk. You can do this in a small pot on the stove over low heat or in the microwave in short 20-30 second intervals. Be careful not to boil or scald it; aim for the same target temperature of around 140°F (60°C).
Here are a few effective alternatives:
- Handheld Milk Frother: This is arguably the best and most popular alternative. Submerge the whisk head into your warm soy milk and turn it on. Froth for about 20-30 seconds, or until the milk has doubled in volume and reached your desired consistency.
- French Press: Pour the warm soy milk into a clean French press, filling it no more than one-third full. Insert the plunger and pump it up and down vigorously for about 30 seconds until the milk becomes frothy and thick.
- Mason Jar: For a simple, no-gadget solution, pour warm soy milk into a sealable jar, filling it about halfway. Make sure the lid is on tight and shake vigorously for 45-60 seconds. The milk will aerate and create a simple foam.
For those dedicated to crafting the freshest beverages, exploring homemade plant-based milks can be a rewarding next step. For ultimate control over ingredients and freshness, some enthusiasts prefer making their own. If you’re interested in this approach, Soy Milk Quick offers an expert guide to the best plant milk makers, providing detailed comparisons to help you find the perfect machine for making soy, almond, and oat milk at home.
Your Path to Perfect Soy Lattes
Learning how to steam soy milk is a rewarding skill that unlocks the potential for delicious, café-quality lattes in your own kitchen. While it may seem tricky at first, success hinges on a few core principles. By starting with the right product—a cold, fresh barista-blend soy milk—you set yourself up for a smoother process. From there, it’s a matter of mastering the delicate balance of aeration and temperature control.
Remember to introduce air briefly at the start and then focus on creating a smooth, swirling vortex to refine the texture. Most importantly, always be mindful of the heat, as keeping the temperature below 150°F (65°C) is your best defense against curdling. With a little practice and attention to these details, you’ll soon be pouring silky, creamy soy milk with confidence.
Frequently Asked Questions
1. What is the best temperature to steam soy milk?
The ideal temperature for steaming soy milk is between 130°F and 150°F (55-65°C). This range is hot enough to create a stable foam without scalding the milk or causing it to curdle. If you consistently have issues with curdling, try steaming to a lower temperature, around 120°F (49°C).
2. Can I use regular soy milk for lattes?
While you can use regular soy milk, it is not recommended for achieving the best results. Barista-blend soy milks are specifically formulated with stabilizers and emulsifiers that help create a stable, silky microfoam suitable for lattes and latte art. Regular soy milk is more likely to produce a thin, bubbly foam or curdle when heated.
3. Why does my soy milk curdle in coffee?
Soy milk can curdle when it interacts with heat and acidity. If the milk is overheated during steaming, its proteins will break down and clump together. Additionally, if the coffee you are using is highly acidic (common in light roasts), it can cause the soy milk to separate upon contact. To prevent this, avoid overheating the milk and consider using a darker, lower-acidity coffee roast.