TL;DR
Creating delicious vegan cheese using soy milk is a straightforward and rewarding process, perfect for a nut-free cheese alternative. Unsweetened soy milk serves as an excellent base due to its neutral flavor and high-protein content. You can easily make a simple, spreadable farmer’s cheese by coagulating the milk with an acid like vinegar or lemon juice. For a melty, stretchy cheese perfect for pizzas and sandwiches, soy milk can be combined with starches like tapioca and cooked to achieve a gooey, satisfying texture.
Why Soy Milk Is a Superior Choice for Vegan Cheese
When it comes to homemade vegan cheese, not all plant milks are created equal. Unsweetened soy milk consistently stands out as a top contender for several key reasons. Its neutral taste provides a clean canvas, allowing cheesy flavors from ingredients like nutritional yeast and miso to shine without any competing sweetness or nuttiness. This makes it incredibly versatile for recreating various cheese styles, from tangy cream cheese to savory mozzarella.
The composition of soy milk is uniquely suited for cheesemaking. As noted in a recipe from Shifty Crafty, high-protein soy milk (like the Edensoy brand) is essential because the protein is what coagulates to form curds, much like in traditional dairy cheesemaking. This high protein content also contributes to a richer, creamier final product. Its smooth viscosity is similar to dairy milk, which helps create a familiar and satisfying mouthfeel that other thinner plant milks can’t always replicate. According to The Plant Based School, this nutrient composition is precisely why it makes the creamiest vegan cheese.
For individuals with nut allergies, soy milk is a game-changer, offering a safe and effective path to creamy, satisfying cheese without cashews or almonds. To get the very best results, it’s crucial to select a high-quality, unsweetened soy milk with minimal additives. For those dedicated to freshness, making your own soy milk at home can provide an even cleaner flavor. If you’re exploring this option, Soy Milk Quick offers a comprehensive guide to the best plant milk makers, helping you find the right machine to produce additive-free milk perfect for cheesemaking.
To better understand your options, here’s how soy milk stacks up against other popular plant milks for making cheese:
| Plant Milk | Creaminess & Texture | Melt & Stretch Factor | Flavor Profile |
|---|---|---|---|
| Soy Milk | Excellent. High protein creates a rich, creamy, and smooth texture. | Very good, especially when combined with tapioca starch for a satisfying stretch. | Neutral and savory, making it an ideal base. |
| Almond Milk | Fair. Can be thinner and result in a grainier texture unless blanched almonds are used. | Poor to fair. Lacks the protein and fat structure for a good melt. | Slightly nutty and can be sweet if not carefully selected. |
| Oat Milk | Good. Naturally creamy but can sometimes have a slimy texture when heated excessively. | Fair. Can become gooey but typically lacks the characteristic stretch. | Distinctly oaty and slightly sweet, which can affect the final cheese flavor. |
Essential Ingredients and Equipment
Before you begin your cheesemaking adventure, gathering the right ingredients and tools will ensure a smooth and successful process. While the recipes vary, a core set of components forms the foundation of most soy-based vegan cheeses. Having these on hand will prepare you for crafting everything from a simple spread to a melty masterpiece.
The beauty of soy milk cheese is its simplicity. You don’t need a professional kitchen, just a few key items. Most importantly, you need to understand the role each ingredient plays in creating the final texture and flavor.
Key Ingredients:
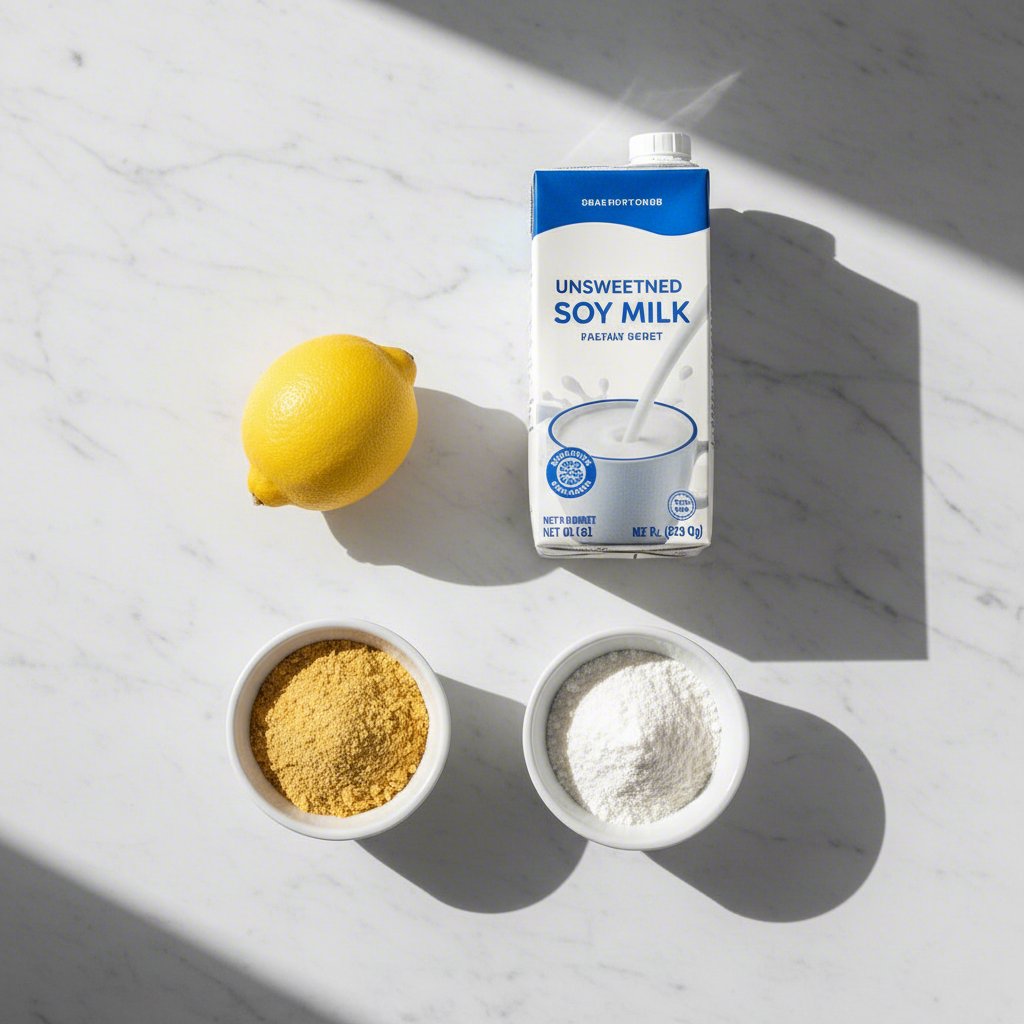
- Unsweetened Soy Milk: The star of the show. Choose a brand with high protein and minimal ingredients for the best results. Always avoid vanilla or other flavored varieties.
- An Acid (Coagulant): For simple farmer’s cheese, you’ll need an acid to curdle the milk. Apple cider vinegar or fresh lemon juice are the most common and effective choices.
- Thickeners & Binders: To achieve a melty, stretchy texture, starches are essential. Tapioca starch (or flour) is the secret weapon for creating elasticity and a classic cheese pull, as highlighted in recipes from Glow Diaries. For a firm, sliceable cheese, agar powder is used as a gelling agent.
- Flavor Enhancers: This is where you transform soy milk into a cheesy delight. Nutritional yeast is non-negotiable for a savory, umami-rich cheese flavor. Salt is crucial for taste, while additions like miso paste, onion powder, garlic powder, and Dijon mustard add depth and complexity.
- Fat: A neutral oil like canola or a flavorful extra virgin olive oil can improve mouthfeel and richness, though some recipes are oil-free.
Essential Equipment:
- Heavy-Bottomed Saucepan: Prevents scorching when heating the milk or cheese mixture.
- Whisk: Critical for removing lumps and ensuring a smooth consistency, especially in cooked, starchy cheeses.
- Blender: A high-speed blender is helpful for some melty cheese recipes to create an ultra-smooth base before cooking, though not all recipes require one.
- Cheesecloth or Nut Milk Bag: Absolutely necessary for straining the curds from the whey when making farmer’s cheese.
- Colander and Bowl: To support the cheesecloth during the draining process.
- Measuring Cups and Spoons: Precision is key, especially with starches and coagulants.
Step-by-Step Recipe: A Simple Soy Farmer’s Cheese
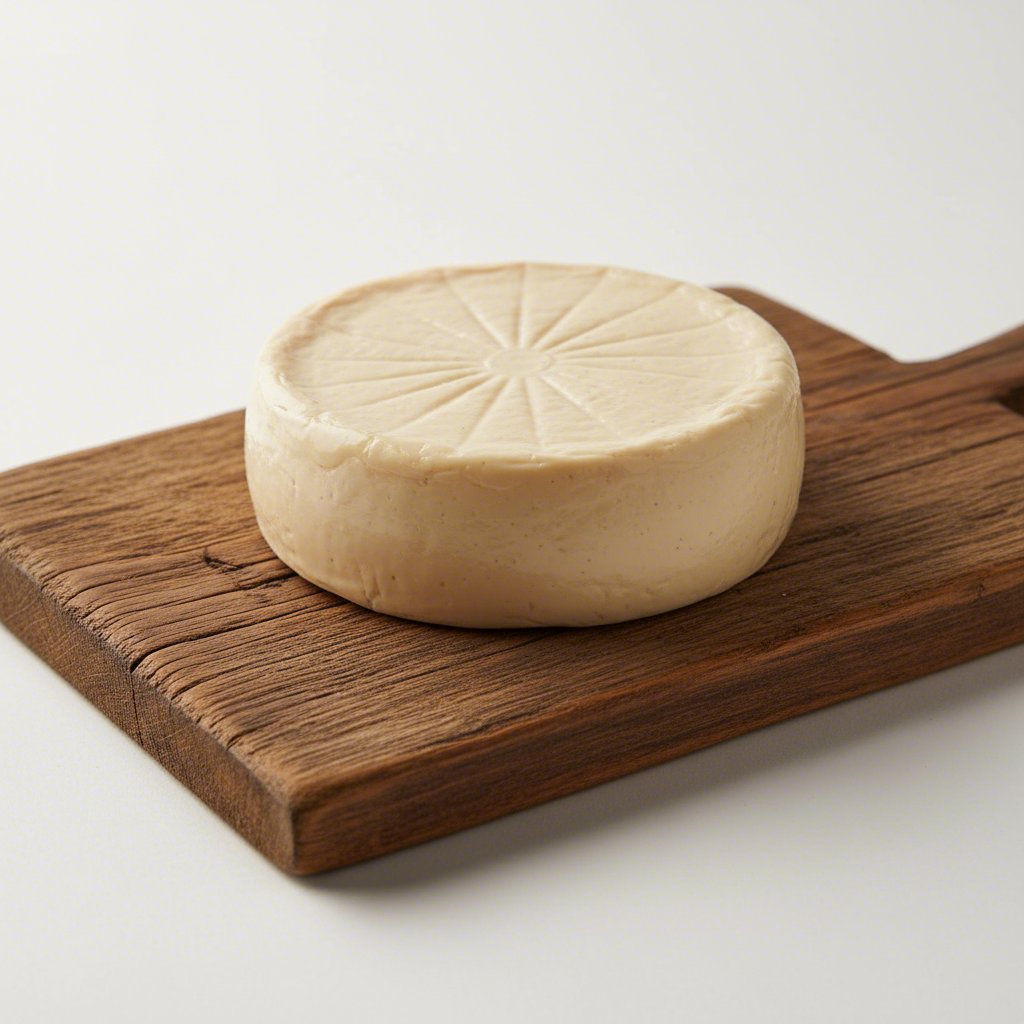
This first recipe is the perfect entry point into the world of homemade vegan cheese. By using a simple coagulation technique, you can transform soy milk into a soft, spreadable farmer’s cheese in about an hour. It’s incredibly versatile and serves as a fantastic substitute for cream cheese, ricotta, or sour cream. The process is gentle and requires patience, but the result is a pure, mild-flavored cheese that you can customize to your liking.
The magic here lies in separating the soy proteins (curds) from the liquid (whey). This is achieved by heating the milk and introducing an acid, which causes the proteins to clump together. Once strained, you’re left with a fresh, creamy cheese. For this method, we’ll follow the simple and effective process outlined by Shifty Crafty.
Ingredients:
- 32 ounces (4 cups) unsweetened, high-protein soy milk
- 3 tablespoons apple cider vinegar or lemon juice
- Optional flavorings: 1/2 tsp salt, garlic powder, or fresh herbs
Instructions:
- Prepare the Milk: Pour the soy milk into a large pot. It’s important to use a pot that is less than half full, as the milk will foam up significantly when it boils.
- Heat the Milk: Bring the soy milk to a rolling boil over medium-high heat. Once boiling, reduce the heat to maintain a simmer and cook for 5 minutes, stirring frequently to prevent a skin from forming or the bottom from scorching.
- Add the Acid: Remove the pot from the heat. While gently stirring the milk, pour in the apple cider vinegar or lemon juice. You should see the milk begin to curdle almost immediately. Stop stirring, cover the pot, and let it sit undisturbed for 5-10 minutes.
- Strain the Curds: Line a colander with a few layers of cheesecloth or a nut milk bag, and place it over a large bowl to catch the whey. Gently pour the curdled milk mixture into the lined colander.
- Drain the Cheese: Gather the corners of the cheesecloth to form a pouch. You can either gently squeeze it to remove excess whey or tie it and hang it over the bowl to drain for 30 to 60 minutes. The longer it drains, the firmer your cheese will be.
- Finish and Store: Once the cheese has reached your desired consistency, transfer it to an airtight container. At this point, you can stir in salt or any other flavorings. It will keep in the refrigerator for up to a week. Don’t discard the leftover whey—it’s nutritious and can be used in soups, smoothies, or for baking.
Advanced Recipe: Creating a Melty, Stretchy Soy Cheese
For many, the ultimate goal of vegan cheese is achieving that perfect, gooey melt for pizza, grilled cheese, or a creamy pasta sauce. This recipe delivers exactly that. By using tapioca starch, we can create a cheese that not only melts but also develops an impressive stretch. This process is different from the simple curdled cheese; instead of separating curds, you’ll create a smooth base and cook it until it transforms into a thick, elastic mixture.
This technique, inspired by recipes from The Plant Based School and Glow Diaries, relies on the scientific properties of tapioca starch to create that coveted cheesy pull. The key is to whisk the ingredients together while cold to avoid lumps, then heat the mixture while stirring constantly. The transformation happens quickly, so be prepared. The result is a soft, spreadable cheese when cool that turns into a wonderfully melty topping when heated.
Ingredients:
- 1 cup unsweetened soy milk
- 1/2 cup unsweetened plain soy yogurt (for tang and creaminess)
- 1/4 cup tapioca starch (also called tapioca flour)
- 2 tablespoons nutritional yeast
- 1 tablespoon olive oil
- 1 tablespoon lemon juice
- 1 teaspoon salt
Instructions:
- Combine Cold Ingredients: In a small saucepan, add the soy milk, tapioca starch, nutritional yeast, olive oil, and salt. It is crucial to do this off the heat. Whisk everything together thoroughly until the tapioca starch is fully dissolved and there are no lumps.
- Cook the Mixture: Place the saucepan over medium heat. Begin stirring continuously with the whisk. The mixture will start to thicken. Keep whisking constantly, scraping the bottom and sides of the pan. After about 1-2 minutes, the mixture will become very thick, glossy, and gluey.
- Incorporate Final Ingredients: Once the mixture is thick and pulling away from the sides of the pan, remove it from the heat. Immediately add the soy yogurt and lemon juice.
- Whisk Vigorously: At first, stir gently to incorporate the yogurt and lemon juice. Then, switch to whisking vigorously for about a minute. You will see the texture transform from a gluey mass into a smooth, creamy, and stretchy cheese.
- Use and Store: Your melty vegan cheese is ready to be used immediately. Spread it on pizza dough before baking, dollop it onto pasta, or slather it on bread for a grilled cheese. Store any leftovers in an airtight container in the refrigerator for up to 5 days. It will firm up when cold but will melt beautifully again once heated.

Frequently Asked Questions
1. Can I use soy milk instead of regular milk?
Yes, in most cooking and baking applications, unsweetened soy milk can be substituted for dairy milk in a 1:1 ratio. It performs very well in savory dishes, sauces, and baked goods. While the flavor is slightly different from dairy milk, its creamy consistency and high protein content often yield a very similar texture in the final product.
2. Can you use soy milk in cheese sauce?
Absolutely. Soy milk is one of the best plant-based options for making a vegan cheese sauce. Its creamy texture and neutral flavor provide the perfect base. When combined with nutritional yeast for cheesy flavor and a starch like tapioca or cornstarch to thicken, it creates a rich, smooth sauce ideal for nachos, macaroni, or drizzling over vegetables.